Create new RichFaces Documentation Jira issue

JBoss.orgCommunity Documentation
Copyright © 2008, 2009 Red Hat
The major benefit of the JSF framework is a component based architecture. The component in JSF is not just a set of HTML code rendered and interpreted by a browser. The JSF component is a combination of a client-side widget coupled with the server-side object that represents component behavior including data validation, events handling, business layers bean binding, etc.
Comparing to a page-oriented development approach, JSF allows to use a component-oriented paradigm to build a well-designed, highly customizable UI interface based on reusable components.
However, there is not yet enough sets of rich components on the market that might enable the rapid application development. One of the most important problems is a time-consuming and very complicated process of the component creation. Even the very primitive JSF component requires the UIComponent class, Renderer class, Tag class and a faces configuration file (faces-config.xml) to be written.
In order to use the component library in a Facelets environment, you should add the *.taglib.xml file to this checklist.
Creation of the rich component takes even more time. You have to provide the ListenerTagHandler class, a class for creating a listener interface, an event processing method name in a listener interface, an event class, render specific classes for each possible render kit used with the component.
Therefore, the process of JSF component creation is pretty complicated but repeatable. Jonas Jacobi and John R. Fallows in their "Pro JSF and Ajax Bulling Rich Internet Components" book describe the process in details. This description and used approaches are very similar to our own experience and have been used as a methodology for Component Development Kit (CDK) - a sub-project of RichFaces that allows you to easily create rich components with built-in Ajax support.
The significant features of the Component Development Kit (CDK) are:
Quick development start. A new component development starts from a pre-generated component project template. It contains the whole required infrastructure and necessary files generated. It's necessary only to have a Maven installed. All other required stuff will be loaded and configured automatically. For more information about how to work with Maven on JBoss projects explore corresponding articles at JBoss portal.
Declarative approach for a component development. It's necessary only to specify meta-data and a code specific for your component. All other required artifacts are generated for you.
Independent development life-cycle. Component Development Kit (CDK) presumes development of each component isolated from each other with further assembling them into the component library. Hence, this allows to organize a continuous process when one component is already in production condition, but another is just started.
Possibility to create a first-class rich components with built-in Ajax functionality and add Ajax capability to the existing JSF applications.
Facility for automatic testing. At the moment of generating the initial project structure, the Unit Test classes are also generated. The RichFaces also provides the Mock-test facility that allows to emulate a run-time environment and automatically test components before their are gathered into the result library.
Optimization for different JSF implementations. As soon as the most part of a result code is generated, the Component Development Kit (CDK) becomes able to generate an implementation specific code along with a universal code. It makes sense if it's necessary to optimize a result code using features specific for the particular implementation. For example, for using with JSF 1.2 only.
Create a modern rich user interface look-and-feel with JSP-like templates and skins-based technology. RichFaces comes with a number of predefined skins to get you started, but you can also easily create your own custom skins.
This document is aimed to describe components development with the Component Development Kit (CDK) and its features.
In order to be successful in Component Development Kit (CDK) usage and components development, it's necessary to be acquainted with Java Server Faces and RichFaces framework. To read more on these topics, please, follow the links:
In order to start working with the Component Development Kit (CDK) and to create your rich component, it's necessary to have the following installed:
Browser (on the client side)
After the Maven is installed you should configure it. In this case, please, go to the directory where you've just installed Maven, open a conf/settings.xml file for editing and add to the profiles section this code:
...

<profile>

    <id>cdk</id>

    <repositories>

        <repository>

            <id>maven2-repository.dev.java.net</id>

            <name>Java.net Repository for Maven</name>

            <url>http://download.java.net/maven/1</url>

            <layout>legacy</layout>

        </repository>

        <repository>

            <releases>

                <enabled>true</enabled>

            </releases>

            <snapshots>

                <enabled>false</enabled>

                <updatePolicy>never</updatePolicy>

            </snapshots>

            <id>repository.jboss.com</id>

            <name>Jboss Repository for Maven</name>

            <url>http://repository.jboss.com/maven2/</url>

            <layout>default</layout>

        </repository>

    </repositories>

    <pluginRepositories>

        <pluginRepository>

            <id>maven.jboss.org</id>

            <name>JBoss Repository for Maven Snapshots</name>

            <url>http://snapshots.jboss.org/maven2/</url>

            <releases>

                <enabled>false</enabled>

            </releases>

            <snapshots>

                <enabled>true</enabled>

                <updatePolicy>always</updatePolicy>

            </snapshots>

        </pluginRepository>

        <pluginRepository>

            <releases>

                <enabled>true</enabled>

            </releases>

            <snapshots>

                <enabled>false</enabled>

                <updatePolicy>never</updatePolicy>

            </snapshots>

            <id>repository.jboss.com</id>

            <name>Jboss Repository for Maven</name>

            <url>http://repository.jboss.com/maven2/ </url>

            <layout>default</layout>

        </pluginRepository>

    </pluginRepositories>

</profile>

...
In order to activate a new profile, add the following after the profiles section:
...

<activeProfiles>

    <activeProfile>cdk</activeProfile>

</activeProfiles>

...
Note:
In order to work with Maven from Eclipse, it's possible to download and install the Maven plugin. Please, follow the instruction at Eclipse plugins for Maven page
The environment is set up now to use the Component Development Kit (CDK).
We are going to create two components throughout the RichFaces CDK Developer Guide, but at first you need take the following steps to set up the Project and create your library:
Create a new directory where all the components will be stored (for example Sandbox).
Create a file named pom.xml in the directory with the following content:
<?xml version="1.0" encoding="UTF-8"?>

<project    xmlns="http://maven.apache.org/POM/4.0.0"

            xmlns:xsi="http://www.w3.org/2001/XMLSchema-instance"

            xsi:schemaLocation="http://maven.apache.org/POM/4.0.0 http://maven.apache.org/xsd/maven-4.0.0.xsd">


    <modelVersion>4.0.0</modelVersion>

    <groupId>org.mycompany</groupId>

    <artifactId>sandbox</artifactId>

    <url>http://mycompany.org</url>

    <version>1.0-SNAPSHOT</version>

    <packaging>pom</packaging>

    <dependencies>

        <dependency>

            <groupId>javax.servlet</groupId>

            <artifactId>servlet-api</artifactId>

            <version>2.4</version>

            <scope>provided</scope>

        </dependency>

        <dependency>

            <groupId>javax.servlet</groupId>

            <artifactId>jsp-api</artifactId>

            <version>2.0</version>

            <scope>provided</scope>

        </dependency>

        <dependency>

            <groupId>javax.servlet.jsp</groupId>

            <artifactId>jsp-api</artifactId>

            <version>2.1</version>

            <scope>provided</scope>

        </dependency>

        <dependency>

            <groupId>javax.faces</groupId>

            <artifactId>jsf-api</artifactId>

            <version>1.2_12</version>

        </dependency>

        <dependency>

            <groupId>javax.faces</groupId>

             <artifactId>jsf-impl</artifactId>

             <version>1.2_12</version>

         </dependency>

        <dependency>

            <groupId>javax.el</groupId>

            <artifactId>el-api</artifactId>

            <version>1.0</version>

        <scope>provided</scope>

        </dependency>

        <dependency>

            <groupId>el-impl</groupId>

            <artifactId>el-impl</artifactId>

            <version>1.0</version>

        <scope>provided</scope>

        </dependency>

        <dependency>

            <groupId>javax.annotation</groupId>

            <artifactId>jsr250-api</artifactId>

            <version>1.0</version>

        </dependency>

            <dependency>

            <groupId>org.richfaces.ui</groupId>

            <artifactId>richfaces-ui</artifactId>

            <version>3.3.3.Final</version>

        </dependency>

    </dependencies>

</project>
Close the file
Here are some of these elements with descriptions:
Table 3.1. The POM elements
| Element | Description |
|---|---|
| groupId | Prefix for the Java package structure of your library |
| url | Namespace for your library to be used in the TLD file |
| version | Version of your library |
| scope | Dependency scope is used to limit the transitivity of a dependency, and also to affect the classpath used for various build tasks. "Provided" scope indicates you expect the JDK or a container to provide the dependency at runtime. For example, when you build a web application with RichFaces, you would set the dependency on the Servlet API and related libraries to scope "provided" because the web container provides those classes. |
We a going to create the <inputDate> component that can take a value, process that value, and then push it back to the underlying model as a strongly typed Date object.
The <inputDate> component allows to attach a converter in order to set the desired date format such as mm/dd/yyyy. So the component could convert and validate the date entered by user.
At first we need to create a project for the component itself. In the library directory Sandbox you just created, launch the following command (all in one line):
mvn archetype:create -DarchetypeGroupId=org.richfaces.cdk -DarchetypeArtifactId=maven-archetype-jsf-component -DarchetypeVersion=3.3.3.Final -DartifactId=inputDate
As is easy to see a new directory with the name inputDate will be created. It does not have any components in it yet, but it has this predefined structure:
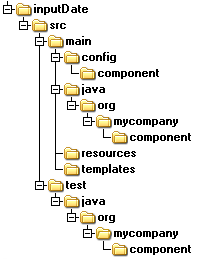
Here are the main directories with descriptions:
Table 4.1. The project structure
| Directory | Description |
|---|---|
| src/main/config | Contains the metadata for the components |
| src/main/java | Contains Java code (both pre-generated and created by you) |
| src/main/resources | Used to store resource files, such as pictures, JavaScript and CSS files |
| src/main/templates | Used to contain the JSP-like templates that define the component layout |
It is necessary to extend a predefined structure with the following directories:
Table 4.2. The project structure
| Directory | Description |
|---|---|
| src/main/config/resources | Contains the resource-config.xml file for the resources registration |
| src/main/java/org/mycompany/renderkit | Contains Renderer Base class |
| src/main/resources/org/mycompany/renderkit/html/css | Used to store CSS files |
| src/main/resources/org/mycompany/renderkit/html/images | Used to store images |
| src/main/templates/org/mycompany | Used to contain the JSP-like template |
Now you should add maven-compiler-plugin to the plugins section in the inputDate/pom.xml file:
...

<plugin>

    <artifactId>maven-compiler-plugin</artifactId>

    <inherited>true</inherited>

    <configuration>

        <source>1.5</source>

        <target>1.5</target>

    </configuration>

</plugin>

...
Finally your inputDate/pom.xml should look like this one:
<?xml version="1.0"?>

<project>

    <parent>

        <artifactId>sandbox</artifactId>

        <groupId>org.mycompany</groupId>

        <version>1.0-SNAPSHOT</version>

    </parent>

    <modelVersion>4.0.0</modelVersion>

    <groupId>org.mycompany</groupId>

    <artifactId>inputDate</artifactId>

    <name>inputDate</name>

    <version>1.0-SNAPSHOT</version>

    <build>

        <plugins>

            <plugin>

                <groupId>org.richfaces.cdk</groupId>

                <artifactId>maven-cdk-plugin</artifactId>

                <version>3.3.3.Final</version>

                <executions>

                    <execution>

                        <phase>generate-sources</phase>

                        <goals>

                            <goal>generate</goal>

                        </goals>

                    </execution>

                </executions>

                <configuration>

                    <library>

                        <prefix>org.mycompany</prefix>

                        <taglib>

                            <shortName>inputDate</shortName>

                        </taglib>

                    </library>

                </configuration>

            </plugin>

            <plugin>

                <artifactId>maven-compiler-plugin</artifactId>

                <inherited>true</inherited>

                <configuration>

                    <source>1.5</source>

                    <target>1.5</target>

                </configuration>

            </plugin>

        </plugins>

    </build>

    <dependencies>

        <dependency>

            <groupId>junit</groupId>

            <artifactId>junit</artifactId>

            <version>3.8.1</version>

            <scope>test</scope>

        </dependency>

        <dependency>

            <groupId>org.richfaces.framework</groupId>

            <artifactId>richfaces-impl</artifactId>

            <version>3.3.3.Final</version>

        </dependency>

    </dependencies>

</project>
Let's create a skeleton for the <inputDate> component.
You need to go to the inputDate directory and then launch the following command:
mvn cdk:create -Dname=inputDate
As a result three artifacts will be created:
An XML configuration file for the metadata
A UI class
A JSP-like template
In order to build the component you should stay in the inputDate directory and launch the following command:
mvn install
This command generates and compiles the library and then creates a result JAR file. A directory named target will be created along with a src directory. If you get a file named target/inputDate-1.0-SNAPSHOT.jar, everything is set up successfully.
If you want to rebuild the component you could use the following command:
mvn clean install
It is a good idea to create at first a prototype of the intended markup. You will find out which markup elements the component has to generate and also which renderer-specific attributes are needed in order to parameterize the generated markup.
The
<inputDate>
component consists of an HTML form <input> element, an
<img> element, and <div> element:
...

<div title="Date Field Component">

    <input name="dateField" value="01 January 2008" />

    <img class="overlay" src="inputDateOverlay.png" />

</div>

...
All information about styles applied to the <inputDate> component is provided in the following chapter.
This is the result of your prototype which shows a simple page with an input field and an icon indicating that this is a date field:

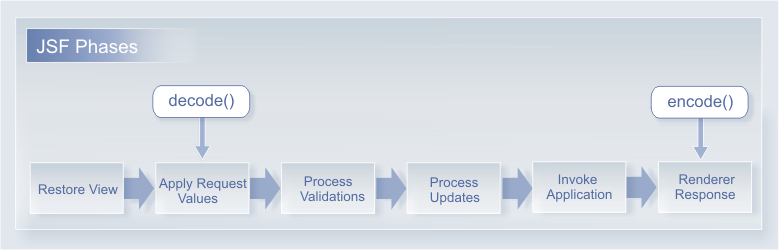
Component functionality typically centers around two actions: decoding and encoding data. Decoding is the process of converting incoming request parameters to the values of the component. Encoding is the process of converting the current values of the component into the corresponding markup. In the following figure you can see decoding and encoding occur in the JSF lifecycle:
Thus, JSF components consist of two parts: the component class and the renderer. The component class is responsible for the state and behavior of a UI component and will be discussed later in the "Configuring component" section.
The Renderer is responsible for the JSF component representation. It generates the
appropriate client-side markup, such as HTML, WML, XUL, etc. Renderer is also
responsible for the converting information coming from the client to the proper type
for the component (for example, a string value from the request is converted to a
strongly type Date object).
It is necessary to create following renderer classes for the <inputDate> component:
InputDateRendererclass where you should overrideencode()methods for encoding the markup and resourcesInputDateRendererBaseclass where you should overridedecode()method. You could also define associated converter in this class.
You could actually implement the renderer-specific component subclass that
exposes client-side attributes such as
"style"
,
"class"
, etc. It is common practice to implement the client-specific component
subclass to make some aspects of application development easier, but in our case we
do not need to do it. The
<inputDate>
is a simple UIInput component, therefore
InputDateRenderer class generates all the markup itself.
It is a time to start creating the InputDateRenderer class.
The smartest way to create the InputDateRenderer class is a Templating mechanism,
one of the most convenient features of the Component Development Kit (CDK).
The Component Development Kit (CDK) allows to use templates for generation Renderer class.
Templates are JSP-like markup pages with special tags that are converted into Renderer by a build script.
It's possible to use evaluated expressions in components templates with the help of scriptlets. It's also possible to create the base class for a template to implement additional functions in it, so as the functions could be called from the template. Hence, in the generated Renderer class there are corresponding function calls on the place of these elements.
Let's create the template for HTML 4.0 markup. At first you should proceed to the inputDate/src/main/templates/org/mycompany directory where htmlInputDate.jspx template file is stored. This file contains a Template Skeleton like this one:
<?xml version="1.0" encoding="UTF-8"?>

<f:root

    xmlns:f="http://ajax4jsf.org/cdk/template"

    xmlns:c=" http://java.sun.com/jsf/core"

    xmlns:ui=" http://ajax4jsf.org/cdk/ui"

    xmlns:u=" http://ajax4jsf.org/cdk/u"

    xmlns:x=" http://ajax4jsf.org/cdk/x"

    class="org.mycompany.renderkit.html.InputDateRenderer"

    baseclass="org.ajax4jsf.renderkit.AjaxComponentRendererBase"

    component="org.mycompany.component.UIInputDate"

    >

    <f:clientid var="clientId"/>

    <div id="#{clientId}"

        x:passThruWithExclusions="value,name,type,id"

        >

    </div>

</f:root>
According to the created UI prototype you need to extend Template Skeleton with proper elements:
<div>-wrapper element with "title", "id" attributes and with the "caption" facet
...

<div id="#{clientId}" title="#{value}" x:passThruWithExclusions="value,name,type,id">

    ...

</div>

...
<input> element with "id", "value", "name", "type", "class", "style" attributes. It is possible to use the "icon" facet in order to redefine a default icon of the component.
...

<input  id="#{clientId}"

        name="#{clientId}"

        type="text"

        value="#{this:getValueAsString(context, component)}"

        class="my-inputDate-input #{component.attributes['inputClass']}"

        style="#{component.attributes['inputStyle']}"/>

...
<img> element with "src", "class", "style" attributes which defines a default icon of the component. In order to add an image to the Template you should register it with the help of <f:resource> template tag and bind to a variable specified by the "var" attribute:
...

<f:resource name="/org/mycompany/renderkit/html/images/inputDate.png" var="icon" />

    ...

<img src="#{icon}" class="my-inputDate-icon #{component.attributes['iconClass']}" style="#{component.attributes['iconStyle']}"/>

...
The <inputDate> component uses styles that should be defined in the template with the help of <h:styles> tag:
...

<h:styles>/org/mycompany/renderkit/html/css/inputDate.xcss</h:styles>

...
How to register all resources is explained in the "Component resources registration" chapter.
Important:
Don't forget to add namespace xmlns:h=" http://ajax4jsf.org/cdk/h" to the
<f:root> element:
<?xml version="1.0" encoding="UTF-8"?>

<f:root

    ...

    xmlns:h=" http://ajax4jsf.org/cdk/h"

    ...

    >

    ...

</f:root>
Here is a full example of the template for the <inputDate> component: htmlInputDate.jspx.
Note:
As it is seen in the Template Skeleton the Renderer Baseclass is org.ajax4jsf.renderkit.AjaxComponentRendererBase.
You need to define Renderer Base class special for the <inputDate> component.
In the next section "Creating a Renderer Base class"
we will create Renderer Base class org.mycompany.renderkit.InputDateRendererBase.
All the Template tags you could find in the "Template tags overview" chapter.
After the component tree is restored on the Restore View Phase ,
each component in the tree extracts its new value from the request parameters
by using its decode() method. Then the value is stored locally on the component.
In order to create InputDateRendererBase class you should proceed to the
src/main/java/org/mycompany/renderkit
directory and create this class there:
package org.mycompany.renderkit;

import java.io.IOException;

import java.util.Map;

import java.util.TimeZone;

import javax.faces.component.UIComponent;

import javax.faces.context.ExternalContext;

import javax.faces.context.FacesContext;

import javax.faces.convert.Converter;

import javax.faces.convert.ConverterException;

import javax.faces.convert.DateTimeConverter;

import org.ajax4jsf.renderkit.HeaderResourcesRendererBase;

import org.mycompany.component.UIInputDate;


public abstract class InputDateRendererBase extends HeaderResourcesRendererBase {

    ...

}
The InputDateRendererBase class extends a HeaderResourcesRendererBase
class. In the HeaderResourcesRendererBase class all the encode() methods for
the right resources encoding
are already implemented, so in the InputDateRendererBase class you need to override
the decode() method only:
 ...

public void decode(FacesContext context, UIComponent component){

    ExternalContext external = context.getExternalContext();

    Map requestParams = external.getRequestParameterMap();

    UIInputDate inputDate = (UIInputDate)component;

    String clientId = inputDate.getClientId(context);

    String submittedValue = (String)requestParams.get(clientId);

    if (submittedValue != null) {

        inputDate.setSubmittedValue(submittedValue);

    }

}

...
As you see in the example above the decode() method reads values from request parameters,
grabs the clientId from the component to identify the request parameter to be looked up.
The clientId is calculated as the fully qualified name of the component given its container path:
nameOfForm:nameOfComponent (for example myForm:inputDate).
The last step of the decode() method is to store the submitted value locally on the component.
Note:
By default, the base Renderer implementation returns the submittedValue directly without any conversion!
If you want to convert submitted value to a strongly typed object you should implement Converter
and the getConvertedValue() method in your Renderer class (in our case in the InputDateRendererBase class).
As it was mentioned before the <inputDate> component at the Apply Request Values phase takes a value and pushes it to the model as a strongly typed Date object. Therefore you need to implement a Converter in the Renderer Base class and also check whether a Converter has been already attached by the application developer. If the conversion of the value fails, an error message associated with the component is generated and queued on FacesContext.
The getConverter() method of the InputDateRendererBase class returns the a converter, as shown in the following example:
...

private Converter getConverter(FacesContext context, UIInputDate inputDate){

    Converter converter = inputDate.getConverter();

    if (converter == null){

        // default the converter

        DateTimeConverter datetime = new DateTimeConverter();

        datetime.setLocale(context.getViewRoot().getLocale());

        datetime.setTimeZone(TimeZone.getDefault());

        datetime.setType("date");

        datetime.setDateStyle("medium");

        datetime.setPattern("d/m/y");

        converter = datetime;

    }

    return converter;

}

...
During the converter creation you should check whether the application developer has attached a Converter to the <inputDate> component already (for example, <f:convertDateTime>) . If not you should follow the next steps:
create a new DateTimeConverter
get the locale for the client from the context with the help of the
getLocale()method and set it on the new Converter by means of thesetLocale()methodset the time zone, date type, date style, and date pattern on the new converter with the help of
setTimeZone(),setType(),setDateStyle(), andsetPattern()methods respectivelyreturn the Converter
After the Apply Request Values phase the application enters the
Process Validation phase during which the validate() method
calls the getConvertedValue() method on every submitted value and passes
the newly submitted value from the decode process.
The getConvertedValue() method converts the submitted value to a strongly typed
object (in our case Date) using the getAsObject() method.
Then the new strongly typed object is validated and if there are no errors
Process Validation phase ends. Otherwise the getConvertedValue() method
throws a ConverterException.
Here is the snippet:
...

public Object getConvertedValue(FacesContext context, UIComponent component, Object submittedValue) throws ConverterException{

    UIInputDate inputDate = (UIInputDate)component;

    Converter converter = getConverter(context, inputDate);

    String valueString = (String)submittedValue;

    return converter.getAsObject(context, component, valueString);

}

...
Finally on the Renderer Response phase the value of the component is rendered back to the view.
The converter is responsible for transforming the object data back in to a string representation, so you need to
implement getValueAsString() method:
Here is the example:
...

protected String getValueAsString(FacesContext context, UIComponent component) throws IOException {

    UIInputDate inputDate = (UIInputDate) component;

    String valueString = (String) inputDate.getSubmittedValue();

    if (valueString == null) {

        Object value = inputDate.getValue();

        if (value != null) {

            Converter converter = getConverter(context, inputDate);

            valueString = converter.getAsString(context, component, value);

        }

    }

    return valueString;

}

...
You could find the whole example of the InputDateRendererBase class inInputDateRendererBase.java file.
One of the significant features of the Component Development Kit (CDK) is a skins-based technology which helps you to create a modern rich user interface look-and-feel. RichFaces has a number of predefined skins you could use with the <inputDate> component. But if you want to create your own skin, please, read carefully the "Skinnability" section of the RichFaces Developer Guide. You could find all necessary information about Built-in skinnability in RichFaces, XCSS file format, Plug-n-Skin feature, etc. there.
It's time to create XCSS file. You should go to the src/main/resources/org/mycompany/renderkit/html/css and create inputDate.xcss file there with the following skeleton:
<?xml version="1.0" encoding="UTF-8"?>

<f:template xmlns:f='http:/jsf.exadel.com/template'

   xmlns:u='http:/jsf.exadel.com/template/util'

   xmlns="http://www.w3.org/1999/xhtml">

    ...

</f:template>
According to the <inputDate> markup you need to define following selectors and classes in the inputDate.xcss:
.my-inputDate-input,.my-inputDate-iconselectors...
<u:selector name=".my-inputDate-input">
<u:style name="border-color" skin="panelBorderColor"/>
<u:style name="background-color" skin="controlBackgroundColor"/>
<u:style name="color" skin="controlTextColor"/>
<u:style name="font-family" skin="generalFamilyFont"/>
<u:style name="font-size" skin="generalSizeFont"/>
</u:selector>
<u:selector name=".my-inputDate-icon">
<u:style name="border-color" skin="panelBorderColor"/>
<u:style name="background-image">
<f:resource f:key="/org/mycompany/renderkit/html/images/inputDate.png" />
</u:style>
</u:selector>
...
.my-inputDate-input,.my-inputDate-icon, and.my-inputDate-captionclasses...
.my-inputDate-input{
background-color: #EBEBE4;
border: 1px solid #7F9DB9;
float:left;
}
.my-inputDate-icon{
margin-left: 3px;
}
.my-inputDate-caption{
color: #000000;
}
...
You could find a complete inputDate.xcss in inputDate.xcss file.
The <inputDate> component has a number of resources that should be registered in the resource-config.xml file. If the resource is registered, the RichFaces filter will send a request to the ResourceBuilder class in order to create and to deliver the resource.
Hence, you need to proceed to the inputDate/src/main/config/resources directory and register the following resources in the resource-config.xml file:
an icon
...

<resource>

    <name>org/mycompany/renderkit/html/images/inputDate.png</name>

    <path>org/mycompany/renderkit/html/images/inputDate.png</path>

</resource>

...
the inputDate.xcss file
...

<resource>

    <name>org/mycompany/renderkit/html/css/inputDate.xcss</name>

    <path>org/mycompany/renderkit/html/css/inputDate.xcss</path>

</resource>

...
In this resource-config.xml files you could find a complete example of the resource-config.xml for the <inputDate> component.
The resource-config.xml is a file for resources registration. Note, that the resource-config.xml should appear in the META-INF folder after the component building.
This file has the <resource-config> root element with nested <resource> elements.
It is possible to register static resources (images, JavaScript , CSS, XCSS, SWF, (X)HTML, XML, Log files), dynamic created images, component-incapsulated, JAR resources, etc.
Here is a simple example of the image registration:
...

<resource>

    <name>org/mycompany/renderkit/html/images/inputDate.png</name>

    <path>org/mycompany/renderkit/html/images/inputDate.png</path>

</resource>

...
There are two elements in the example above: an obligatory <name> element which defines resource name and a <path> element which defines the path to the resource. The <path> element is optional as it is possible to register dynamic resources with the "class" attribute. For example you could register a dynamically created image as it is shown in the following example:
...

<resource class="org.mycompany.renderkit.html.images.inputDate">

    <name>org.mycompany.renderkit.html.images.inputDate</name>

</resource>

...
With the help of the <cacheable> element you could manage whether the resource is cached or not. If the value of this element is "true", the resource is cached on the server and also on the client sides:
...

<resource class="org.mycompany.renderkit.html.images.inputDate">

    <name>org.mycompany.renderkit.html.images.inputDate</name>

    <cacheable>true</cacheable>

</resource>

...
You could start a session for the some resource using <session-aware> element set to "true":
...

<resource>

    <name>org/mycompany/renderkit/html/scripts/inputDate.js</name>

    <path>org/mycompany/renderkit/html/scripts/inputDate.js</path>

    <session-aware>true</session-aware>

</resource>

...
Sometimes the definition of a content type of the resource is needed, so it is possible to add the <content-type> element with the proper MIME type.
You could also define a custom renderer for the resource:
...

<resource>

    <name>org/mycompany/renderkit/html/scripts/inputDate.js</name>

    <path>org/mycompany/renderkit/html/scripts/inputDate.js</path>

    <renderer class="org.ajax4jsf.resource.ScriptRenderer"/>

</resource>

...
It is possible to specify a MIME type for the resource renderer using the <content-type> element.
The base class for all JSF components is UIComponent.
When you develop <inputDate> component
you could see that you subclass UIComponentBase at first.
This class extends UIComponent, and provides default implementations of the all of the abstract methods of UIComponent.
You could proceed to the src/main/java/org/mycompany/component directory and find a UIInputDate.java there:
package org.mycompany.component;

import javax.faces.component.UIComponentBase;

/**

 * JSF component class

 *

 */

public abstract class UIInputDate extends UIComponentBase {

    public static final String COMPONENT_TYPE = "org.mycompany.InputDate";

    public static final String COMPONENT_FAMILY = "org.mycompany.InputDate";

}
The <inputDate> is a simple
input component therefore you should import javax.faces.component.UIInput class and extend it:
package org.mycompany.component;

import javax.faces.component.UIInput;

/**

 * JSF component class

 *

 */

public abstract class UIInputDate extends UIInput {

    public static final String COMPONENT_TYPE = "org.mycompany.InputDate";

    public static final String COMPONENT_FAMILY = "org.mycompany.InputDate";

}
Each component is associated with a component type, which is used as "JSF recognized" name of the <inputDate> component. We will refer to this later in our tag handler.
The component class is the actual class path address of our <inputDate> component.
As it was mentioned before, the <inputDate> component has some attributes
that are bound to the properties in the UIInputDate class
(for example title, name, type, etc.).
The next thing to do is to save the component state
by overriding saveState() and restoreState() component methods.
But you do not have to do it in the UIInputDate class by hand!
You should configure the <inputDate> component
in the inputDate.xml,
and the CDK factory will generate the complete UIInputDate class.
How to configure the component is explained in the "Configuring component" chapter.
Well, it is almost the final step in the component creation process - component configuration.
Note that you should register all the classes and attributes of the <inputDate> component. If you will create the component dynamically on a page you should register the component in the faces context configuration file - faces-config.xml. If you use a custom tag on a JSP page you need a TLD file for registration. If you plan to use Facelets you need inputDate.taglib.xml descriptor.
The CDK factory uses the inputDate.xml file
for generating not only the complete UIInputDate class,
but also a JSP Tag Handler, faces-config.xml and descriptors for JSP and Facelets.
Please, proceed to the src/main/config/component directory, open the inputDate.xml in your favorite text editor and take a look at the skeleton: there is a root element <components> with the one nested <component> element.
Tip:
It is possible to create a number of components in the one project. For example <rich:dataTable> is a complex component that includes a <rich:column> and/or <rich:columns> components.
Application instance stores resources defined in the descriptors at application start-up, so it is necessary to register following classes:
the
UIInputDateclass...
<name>org.mycompany.InputDate</name>
<family>org.mycompany.InputDate</family>
<classname>org.mycompany.component.html.HtmlInputDate</classname>
<superclass>org.mycompany.component.UIInputDate</superclass>
...
the
InputDateRendererclass with thehtmlInputDate.jspxtemplate...
<renderer generate="true" override="true">
<name>org.mycompany.InputDateRenderer</name>
<template>org/mycompany/htmlInputDate.jspx</template>
</renderer>
...
the
InputDateTagclass (the JSP Tag Handler)...
<tag>
<name>inputDate</name>
<classname>org.mycompany.taglib.InputDateTag</classname>
<superclass>
org.ajax4jsf.webapp.taglib.HtmlComponentTagBase
</superclass>
</tag>
...
Note that you have not closed the <component> element because you are still going to add more metadata for your new component. Lets to add attributes to the inputDate.xml configuration file as shown in the example below.
Example:
...
<property>
<name>value</name>
<classname>java.lang.Object</classname>
<description>
The value of the component
</description>
</property>
<property>
<name>title</name>
<classname>java.lang.String</classname>
<description>
Defines a title of the component
</description>
<defaultvalue>"inputDate"</defaultvalue>
</property>
<property>
<name>name</name>
<classname>java.lang.String</classname>
<description>
Defines a name of the component
</description>
</property>
<property>
<name>styleClass</name>
<classname>java.lang.String</classname>
<description>
Corresponds to the HTML class attribute
</description>
</property>
<property>
<name>inputStyle</name>
<classname>java.lang.String</classname>
<description>
Style attribute for input field
</description>
</property>
<property>
<name>inputClass</name>
<classname>java.lang.String</classname>
<description>
Style Class attribute for the input field
</description>
</property>
<property>
<name>iconClass</name>
<classname>java.lang.String</classname>
<description>
Style Class attribute for the icon element
</description>
</property>
<property>
<name>iconStyle</name>
<classname>java.lang.String</classname>
<description>
Style attribute for the icon element
</description>
</property>
<property>
<name>captionClass</name>
<classname>java.lang.String</classname>
<description>
Style Class attribute for the Caption facet
</description>
</property>
...
As you can see in the example above every attribute is defined with the help of the <property> element with the following nested elements:
the <name> element that defines the name of the attribute
the <classname> element that defines the class of the attribute's value
the <description> element that defines the description of the attribute. This description appears in the TLD file.
the <defaultvalue> element that defines the default value for the attribute
The last thing worth mentioning is the common attributes that are included through the named entities:
...

&ui_component_attributes;

...
If you want to add UIInput components and HTML events common attributes for the
<inputDate> component you should add the following entities:
...

&ui_component_attributes;

&html_events;

&ui_input_attributes;

...
In inputDate.xml file there is a full example of the inputDate.xml for the <inputDate> component.
More information about the common attributes you could find in the Including common attributes section.
One of the useful features of the CDK is the possibility to include common attributes to the component. In order to facilitate development process, the CDK provides a set of entities that contain custom attributes sets for components (events, action attributes, etc.). This common attributes could be included with the predefined entities (for example &ui_component_attributes;, &html_events;, &ui_input_attributes;, etc.).
You could find all the entities inRichFaces repository.
The last step is to create a JSP tag handler and descriptors.
JSF components are not inherently tied to JSP. You will use a custom tag (a.k.a action) on the JSP page to
indicate which JSF UIComponent is needed for the application.
The custom tag has a corresponding tag handler class, which is responsible for creating the UIComponent
and transferring each declarative JSP tag attribute to the UIComponent instance.
Hence you need a custom tag class that returns
the component type (org.mycompany.InputDate) and the renderer (org.mycompany.InputDateRenderer).
After the tag class creation you need to register it in the descriptors: in the TLD (Tag Library Descriptor) file for JSP pages and in the inputDate.taglib.xml file for Facelets.
But you know that inputDate.xml configuration file generates the JSP tag handler and descriptors instead of you! Just proceed to the inputDate folder and launch the following command:
mvn clean install
After the generation process you will find in the inputDate/target/classes/META-INF folder inputDate.tld, inputDate.taglib.xml, resources-config.xml, and faces-config.xml files.
The InputDateTag class could be found in the inputDate/target/classes/org/mycompany/taglib.
Well done! The <inputDate> component is created. The inputDate-1.0-SNAPSHOT.jar for the component usage could be found in the inputDate/target folder.
After the <inputDate> component has been created you could use it on a page. Create a simple JSF project, called myapp for example, with only one JSP page that has a form with our <inputDate> component.
Here is the necessary page (index.jsp):
<%@ taglib uri="http://java.sun.com/jsf/html" prefix="h"%>

<%@ taglib uri="http://java.sun.com/jsf/core" prefix="f"%>

<%@ taglib uri="http://mycompany.org/inputDate" prefix="my"%>

<html>

    <head>

        <title>My inputDate</title>

    </head>

    <body>

        <f:view>

            <h:form>

                <my:inputDate value="#{bean.text}">

                    <f:facet name="caption">

                        <f:verbatim>

                            Calendar:

                        </f:verbatim>

                    </f:facet>

                </my:inputDate>

                <h:commandButton value="Submit" />

            </h:form>

        </f:view>

    </body>

</html>
In order to build this application, you should create a managed bean:
package app;


public class Bean {


    private String text = null;


    public Bean() {


    }


    public String getText() {

        return text;

    }


    public void setText(String text) {

        this.text = text;

    }

}
It is necessary to register your bean inside of the faces-config.xml file:
<?xml version="1.0" encoding="UTF-8"?>

<faces-config

    xmlns="http://java.sun.com/xml/ns/javaee"

    xmlns:xsi="http://www.w3.org/2001/XMLSchema-instance"

    xsi:schemaLocation="http://java.sun.com/xml/ns/javaee http://java.sun.com/xml/ns/javaee/web-facesconfig_1_2.xsd"

    version="1.2">

    <managed-bean>

        <managed-bean-name>bean</managed-bean-name>

        <managed-bean-class>myapp.Bean</managed-bean-class>

        <managed-bean-scope>request</managed-bean-scope>

    </managed-bean>

</faces-config>
It is also necessary to take following steps:
add necessary jar files (inputDate-1.0-SNAPSHOT.jar, jsf-api.jar, jsf-impl.jar, jstl-api-1.2.jar, richfaces-api-3.3.3.jar, richfaces-impl-3.3.3.jar, richfaces-ui-3.3.3.jar, commons-logging.jar, commons-digester.jar, commons-collections.jar, commons-beanutils.jar, common-annotations.jar) into the WEB-INF/lib folder
modify the web.xml file:
<?xml version="1.0" encoding="UTF-8"?>

<web-app xmlns:xsi="http://www.w3.org/2001/XMLSchema-instance" xmlns="http://java.sun.com/xml/ns/javaee" xmlns:web="http://java.sun.com/xml/ns/javaee/web-app_2_5.xsd"

                xsi:schemaLocation="http://java.sun.com/xml/ns/javaee http://java.sun.com/xml/ns/javaee/web-app_2_5.xsd" id="WebApp_ID" version="2.5">

    <display-name>app</display-name>

    <context-param>

        <param-name>javax.faces.CONFIG_FILES</param-name>

        <param-value>/WEB-INF/faces-config.xml</param-value>

    </context-param>

    <context-param>

        <param-name>javax.faces.STATE_SAVING_METHOD</param-name>

        <param-value>server</param-value>

    </context-param>

    <servlet>

        <servlet-name>Faces Servlet</servlet-name>

        <servlet-class>javax.faces.webapp.FacesServlet</servlet-class>

        <load-on-startup>1</load-on-startup>

    </servlet>

    <servlet-mapping>

        <servlet-name>Faces Servlet</servlet-name>

        <url-pattern>*.jsf</url-pattern>

    </servlet-mapping>

    <login-config>

        <auth-method>BASIC</auth-method>

    </login-config>

    <filter>

        <display-name>RichFaces Filter</display-name>

        <filter-name>richfaces</filter-name>

        <filter-class>org.ajax4jsf.Filter</filter-class>

    </filter>

    <filter-mapping>

        <filter-name>richfaces</filter-name>

        <servlet-name>Faces Servlet</servlet-name>

        <dispatcher>REQUEST</dispatcher>

        <dispatcher>FORWARD</dispatcher>

        <dispatcher>INCLUDE</dispatcher>

    </filter-mapping>

</web-app>
Finally, you should be able to place this application on your Web server. To start your project, point your browser at http://localhost:8080/myapp/index.jsf.
The RichFaces CDK allows you to create samples easier as it has been discussed earlier in the "Component usage overview" chapter. Let's create a simple JSF project, called inputDate-sample for example, with the help of the maven-archetype-jsfwebapp archetype.
It is necessary to proceed to your Sandbox directory where you have created the <inputDate> component and launch the following command (all in one line):
mvn archetype:create -DarchetypeGroupId=org.richfaces.cdk -DarchetypeArtifactId=maven-archetype-jsfwebapp -DarchetypeVersion=3.3.3.Final -DgroupId=org.mycompany -DartifactId=inputDate-sample
As easy to see a new directory inputDate-sample is created with the predefined JSF project structure:
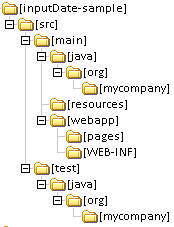
It should be pointed out that maven-archetype-jsfwebapp archetype creates skeletons of the following files: JSP page, Facelets page, managed bean already registered in the faces-config.xml, complete deployment descriptor (web.xml).
Now it is necessary to edit a JSP page, managed bean skeletons, and add the proper dependency to the pom.xml file of the inputDate-sample project.
You should proceed to the inputDate-sample/src/main/webapp/pages directory and edit index.jsp file. You should add a form with our <inputDate> component.
Here is the full page (index.jsp):
<%@ taglib uri="http://java.sun.com/jsf/html" prefix="h"%>

<%@ taglib uri="http://java.sun.com/jsf/core" prefix="f"%>

<%@ taglib uri="http://mycompany.org/inputDate" prefix="my"%>

<html>

    <head>

        <title>My inputDate</title>

    </head>

    <body>

        <f:view>

            <h:form>

                <my:inputDate value="#{bean.text}">

                    <f:facet name="caption">

                        <f:verbatim>

                            Calendar:

                        </f:verbatim>

                    </f:facet>

                </my:inputDate>

                <h:commandButton value="Submit" />

            </h:form>

        </f:view>

    </body>

</html>
In order to build this application, you should edit already created managed bean:
package org.mycompany;


public class Bean {


    private String text = null;


    public Bean() {


    }


    public String getText() {

        return text;

    }


    public void setText(String text) {

        this.text = text;

    }

}
In order to use any component on a page (JSF, Facelets, RichFaces, etc.) you should add necessary libraries to the JSF project. Sometime it takes a lot of time to get all the dependencies of a particular library. You should also prevent versions conflict if the library already exists on a server. Now we are going to add necessary libraries to the JSF project, deploy and run project on a server. Maven will help us.
Maven is a high-level, intelligent build and deployment tool designed to take much of the hard work out of the build process. In Maven's Project Object Model (POM) file we could declare necessary dependent libraries and Maven plugins used to manage all parts of the build process.
Our <inputDate> component depends on JSF and RichFaces libraries. If you declare inputDate dependency in the inputDate-sample project's POM all the necessary libraries will be added automatically. Therefore you need to delete richfaces-ui artifact out of dependencies first and then add only one inputDate dependency:
...

<dependency>

    <groupId>org.mycompany</groupId>

    <artifactId>inputDate</artifactId>

    <version>1.0-SNAPSHOT</version>

</dependency>

...
Now it is possible to build the inputDate-sample project with the help of the following command:
mvn install
The final step is to deploy and run the project on a server. One of the convenient features of Maven is the Jetty plugin. Jetty is an open-source web server implemented entirely in Java. In order to deploy and run the project on the Jetty you should take the following steps:
add the maven-jetty-plugin to the pom.xml:
...

<plugin>

    <groupId>org.mortbay.jetty</groupId>

    <artifactId>maven-jetty-plugin</artifactId>

    <version>6.1.5</version>

    <configuration>

        <scanIntervalSeconds>10</scanIntervalSeconds>

        <connectors>

            <connector implementation="org.mortbay.jetty.nio.SelectChannelConnector">

                <port>8080</port>

                <maxIdleTime>60000</maxIdleTime>

            </connector>

        </connectors>

    </configuration>

</plugin>

...
launch the following command in the inputDate-sample directory:
...

mvn jetty:run

...
after the scanner has been started point your browser at http://localhost:8080/inputDate-sample.
That' all! Your sample JSF project has been created.
Here you can find the whole pom.xml file.
Unit testing is a method of testing that verifies the individual units of source code are working properly. A unit is the smallest testable part of an application, method for example.
The goal of unit testing is to isolate each part of the program and show that the individual parts are correct. Unit tests find problems early in the development cycle and allow you to perform code refactoring at a later date, and make sure the module still works correctly. By testing the parts of a program first and then testing the sum of its parts, integration testing becomes much easier.
Unit testing provides a sort of living documentation of the system. You could learn unit functionality by looking at the unit test and get a basic understanding of the unit API.
Note:
Unit testing cannot be expected to catch every error in the program. It only tests the functionality of the units themselves. Therefore it is more effective if the other software testing activities are used in conjunction with unit tests.
Unit tests generated by CDK check all the properties of the component, resources availability, and perform render test view.
In order to add unit tests to the project you should take the following steps:
proceed to the inputDate/src/main/config/component directory, open the inputDate.xml file
add the <test> element nested to <component> in order to generate unit test for the UIInputDate class
...

<test>

    <classname>org.richfaces.component.html.HtmlInputDateComponentTest</classname>

    <superclassname>org.ajax4jsf.tests.AbstractAjax4JsfTestCase</superclassname>

</test>

...
add the <test /> element nested to <tag> in order to generate unit test for the InputDateTag class
...

<tag>

    <name>inputDate</name>

    <classname>org.mycompany.taglib.InputDateTag</classname>

    <superclass>org.ajax4jsf.webapp.taglib.HtmlComponentTagBase</superclass>

    <test/>

</tag>

...
proceed to the inputDate directory, and add new execution with the generate-tests goal to pom.xml
...

<execution>

    <id>generate-test-sources</id>

    <phase>generate-test-sources</phase>

    <goals>

        <goal>generate-tests</goal>

    </goals>

</execution>

...
launch the following command in the inputDate directory
mvn clean install
If all the tests have been run successfully, the "BUILD SUCCESSFUL" message will appear.
You could also find detailed tests information in the surefire reports placed in the inputDate/target/surefire-reports directory.
As you could have mentioned the process of the JSF component creation is pretty labor-intensive but repeatable. During the CDK Guide you have created a simple <rich:inputDate> component. However when creating components in the wild you need debugger, class browser, object inspector, class hierarchy diagram, etc. to simplify development process and maximize productivity. In other words you need an IDE.
The question is what IDE is more suitable for the JSF component development. There is no one answer for this question and the right of private judgment in matters of choosing IDE, is better secured to us than to any other people in the world.
Eclipse IDE seems to be more preferable for the rapid component creation process.
Tip:
RichFaces full support is implemented in JBoss Developer Studio and in JBoss Tools.
During the development process you could be confronted with some difficulties. For example, it is necessary to rebuild component every time you want to check your work on it in a developer sample. It is also hard to debug JavaScript scenario without IDE's help.
First of all you need to download and install Eclipse IDE for Java EE Developers.
After that you need to build <rich:inputDate> component and it's sample project for the import as existing Eclipse projects. It is necessary to proceed to the Sandbox/inputDate and Sandbox/inputDate-sample directories and launch the following command:
mvn eclipse:eclipse -Dwtpversion=1.5
The command you've launched above creates files and folders necessary for the import. The -Dwtpversion=1.5 key indicates
that you have Web application, so it should be possible to run it on a server.
Finally you need to make import. You can find a step-by-step tutorial at the Eclipse documentation page or simply in the Help > Help Contents of the Eclipse. As the result two projects should appear in the workspace:
Now it is necessary to define <rich:inputDate> component JAR you have imported on the build path of the inputDate-sample project.
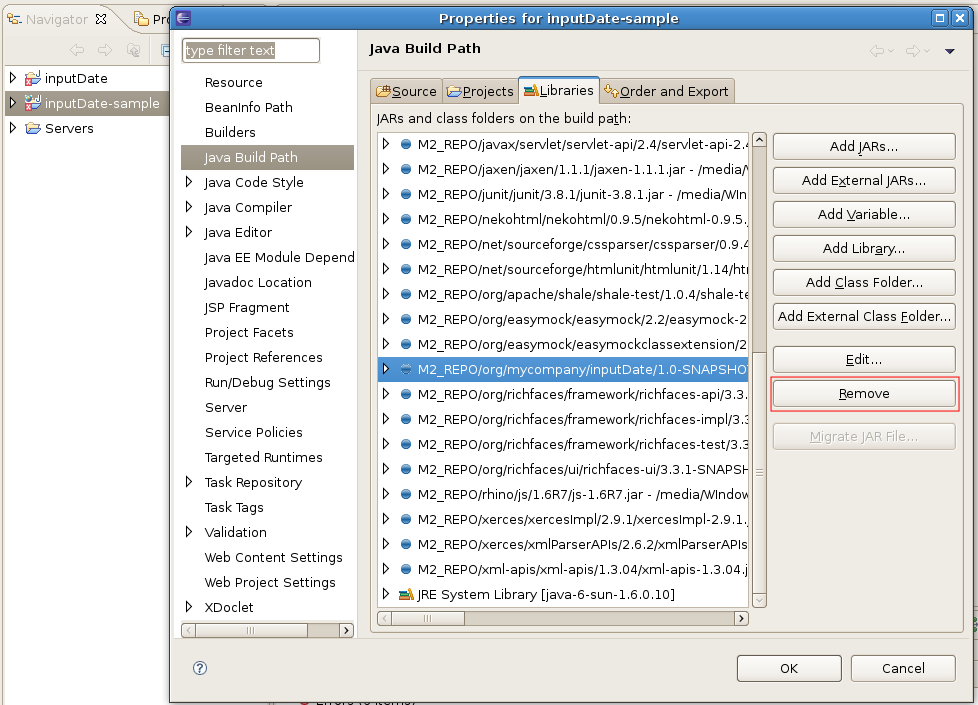
You need to select Properties of the inputDate-sample project, proceed to the Java Build Path > Libraries tab and then remove "inputDate-1.0-SNAPSHOT.jar" item.
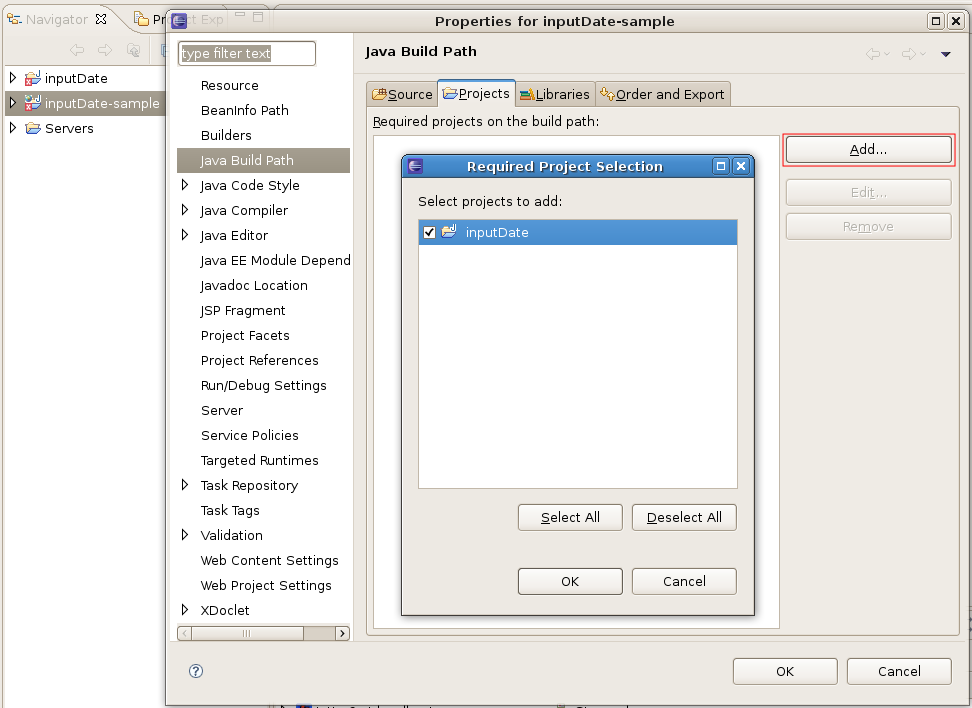
After that you need to proceed to the Java Build Path > Projects tab and add already imported inputDate project.
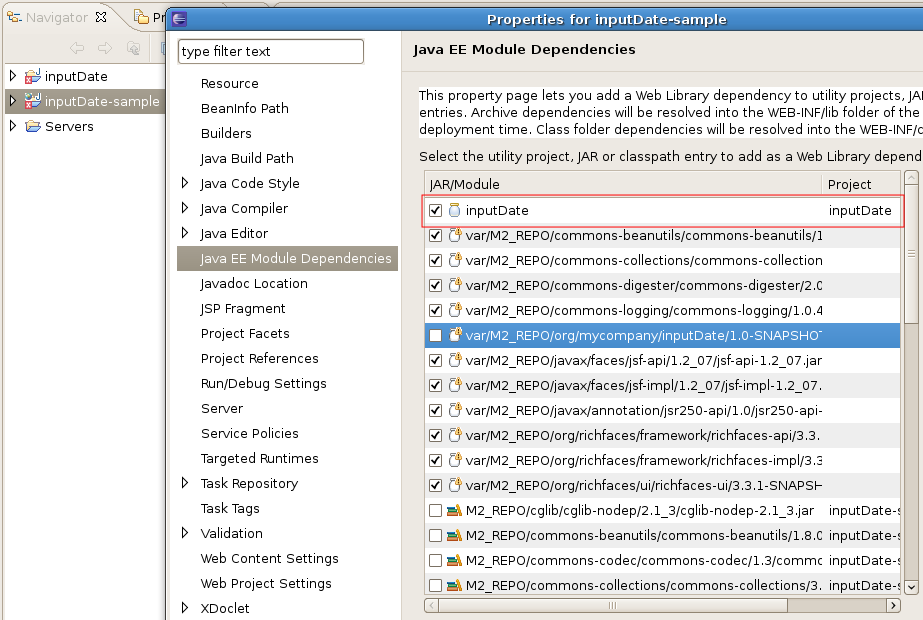
Finally you should select Java EE Module Dependecies, uncheck var/M2_REPO/org/mycompany/inputDate/1.0-SNAPSHOT/inputDate-1.0-SNAPSHOT.jar, and check imported inputDate module.
That's all! Now it is possible to create a server (Apache Tomcat, for example) and run inputDate-sample.
Actually you can build/rebuild your projects for the import at any time you want.
In order to rebuild existing project for the import you should use the following command:
mvn eclipse:clean eclipse:eclipse -Dwtpversion=1.5
In conclusion it should be pointed out that binding <rich:inputDate> component project and developer sample give you more advantages such as editing any sources on-the-fly, debugging JavaScript, etc.
NetBeans is another free, open-source IDE that provides plenty of features and tools you need to create professional enterprise, web applications.
Once you have built your projects for Eclipse IDE you can easily migrate to NetBeans IDE. You can get all necessary information at Automatically Import Your Projects From Eclipse to NetBeans IDE page.

During the development process, the next naming convention for all project stuff should be mentioned.
At first take a look at the definitions that are used in this structure. Uppercase symbols means Java names notation. For name "foo" <name> means "foo", and <Name> - "Foo":
Table 9.1. The structure definitions
| Definition | Description |
|---|---|
| <prefix> | A common library name for example, base JSF components use <javax.faces> prefix. The value for prefix get from an abstract component package or a renderer template path. |
| <name> | A name for a base component. For UIInput component <name> is "input". The value for a component name generator could be obtained from UI or Abstract class name. |
| <markup> | A render-kit generated content name: "html" for HTML/XHTML pages, "wml" for mobile content, etc. It should be provided in the render-kit description by Ant task or in Maven's POM. By default, "html" is used. |
| <rendererName> | A name of the renderer for concreting a visual component implementation, e.g. "commandButton" , "panelGroup", etc. A generator can take <rendererName> from a template file name. |
| <event> | A name for a Faces Event: "action" for all ActionSource components like UICommand. It could be provided in the component configuration, or obtain from the implemented source interface. |
Now let's take a look to the naming convention. By default, a generator expects the written Java classes structure above:
Table 9.2. The Java classes structure
| Naming convention | Description |
|---|---|
| <prefix>.component.Abstract<Name> | An optional abstract super-class for a JSF component. In order to avoid manual writing for EL-enabled getters/setters, saveState/restoreState methods, listener-related methods etc., you can create an abstract class, and a generator creates the implementation. |
| <prefix>.component.UIt<Name> | A Base component class. It can be generated from the abstract superclass or created by a developer. |
| <prefix>.component.<markup>.<Markup><RendererName> | A renderer-specific generated component. The <Markup> is a render-kit specific generation name such as html, xml, wml. In addition to the UI Component class, this class contains Java Bean getter/setter methods for renderer-specific attributes. This class is generated by CDK. |
| <prefix>.t<Name> | A JSF UI component type. Can be provided in the configuration or calculated from a component class name. |
| <prefix>.<Markup><RendererName> | A renderer-specific JSF component type. Can be provided in the configuration or calculated from the renderer name. |
| <prefix>.renderkit.<RendererName>RendererBase | A Renderer Base class is an optional Renderer superclass, implements methods from the template renderer. Should be created by you. |
| <prefix>.renderkit.<markup><RendererName> | A generated Renderer |
| <prefix>.<RendererName> | A JSF renderer type. Can be provided in the configuration or calculated from a renderer name. |
| <prefix>.<Markup><RendererName>.xml | A template for generating the renderer class. JSPX syntax is used. Should be provided by you. |
| <prefix>.taglib.<RendererName>Tag | A JSP tag class |
| <prefix>.taglib.<RendererName>TagHandler | A Facelets Tag Handler class. |
| <RendererName> | A JSP/Facelets Tag name |
Here is the Java classes structure for the components, that uses JSF events:
Table 9.3. The Java classes structure for components, that uses JSF events
| Naming convention | Description |
|---|---|
| <prefix>.event.<Event>Event | An event class, that you should provide. |
| <prefix>.event.<Event>Listener | An event listener interface,that could be generated by CDK |
| <prefix>.event.<Event>Source | An interface for an event processing component, that includes the following methods: add<Event>Listener(<Event>Listener listener ), remove<Event>Listener(<Event>Listener listener ) |
| <prefix>.event.<Event>EventWrapper | A wrapper class, that is used for binding listener's EL-expression in user's beans. |
| <prefix>.taglib.<Event>ListenerTag | A JSP tag class for a creating listener instance. A parent tag must creates component implementing Source interface. |
| <prefix>.taglib.<Event>ListenerTagHandler | A Facelets tag class for creation of listener instance. |
The <ajax:update> tag allows to update a collection of nodes. By default, Ajax response updates only one node with its children that is marked by id = clientId. If you need to update a number of nodes you should add a comma separated list of ids to <ajax:update> tag.
The <c:if /> tag is a simple conditional tag, which evaluates its body if the supplied condition is true.
Table 10.1. The <c:if /> attributes
| Attribute Name | Description | Required |
|---|---|---|
| test | Defines the test condition that determines whether or not the body content should be processed. | True |
The <c:object /> tag declares a variable that is used in Java code with a value returned by an evaluated expression. A type of the result must match to the type defined by the "type" attribute.
Table 10.2. The <c:object /> attributes
| Attribute Name | Description | Required |
|---|---|---|
| var | Defines a name of the variable | True |
| value | Defines an expression to be evaluated | True |
| type | Defines an object type | True |
The <c:set /> tag declares a request scope variable with a value returned by an evaluated expression.
Table 10.3. The <c:set /> attributes
| Attribute Name | Description | Required |
|---|---|---|
| var | Defines a name of the variable which holds the value | True |
| value | Defines an expression to be evaluated | True |
The <f:attribute /> tag assigns a value to a component attribute.
Table 10.4. The <f:attribute /> attributes
| Attribute Name | Description | Required |
|---|---|---|
| name | Defines the name of a component attribute | True |
| value | Defines a value of the attribute | True |
The <f:clientid /> tag declares a variable with a ClientId of the component as the value.
Table 10.5. The <f:clientid /> attributes
| Attribute Name | Description | Required |
|---|---|---|
| var | Defines a variable name | True |
The <c:forEach /> iterates over a collection, iterator or an array of objects. It uses the same syntax as the standard JSTL <c:forEach /> tag.
Table 10.6. The <c:forEach /> attributes
| Attribute Name | Description | Required |
|---|---|---|
| begin | Defines the starting index | False |
| end | Defines the ending index | False |
| items | Defines the expression used to iterate over. This expression could resolve to an Iterator, Collection, Map, Array, Enumeration or comma separated String. | False |
| step | Defines the index increment step | False |
| var | Defines the variable name to export for the item being iterated over | True |
The <f:call /> tag calls a method. For example it calls an additional method from the base class.
Table 10.7. The <f:call /> attributes
| Attribute Name | Description | Required |
|---|---|---|
| name | Defines a name of a method | True |
| class | Defines a class name | True |
The <f:parameter /> tag specifies a parameter value for a method invoking. It is used within <f:call /> tag.
Table 10.8. The <f:parameter /> attributes
| Attribute Name | Description | Required |
|---|---|---|
| name | Defines a parameter name | True |
| value | Defines a parameter value | True |
The <f:insert /> tag calls some subTemplate.
Table 10.9. The <f:insert /> attributes
| Attribute Name | Description | Required |
|---|---|---|
| name | Defines a template name | True |
The <f:resource /> tag is responsible for receiving a resource object such as image.
Table 10.10. The <f:resource /> attributes
| Attribute Name | Description | Required |
|---|---|---|
| name | Defines a resource name which contains a path to the resource | True |
| var | Defines a resource variable that is used in a template | True |
The <f:root /> tag defines a root element for the renderer template.
Table 10.11. The <f:root /> attributes
| Attribute Name | Description | Required |
|---|---|---|
| class | Defines a name for the generated class | True |
| baseclass | Defines a name for a base class for the renderer | True |
| component | Defines a component name | True |
The <h:scripts> tag defines a static resource or class for JavaScript that is added to a page at rendering time.
The <h:styles> tag defines a CSS or XCSS resource that is added to a page at rendering time.
The <jsp:declaration /> tag declares a Java code that is inserted in a renderer class.
The <jsp:directive.page /> tag allows you to import classes or packages in a renderer class.
Table 10.12. The <jsp:directive.page /> attributes
| Attribute Name | Description | Required |
|---|---|---|
| extends | Defines a base class for the imported classes | False |
| import | Defines classes or packages that are imported in a renderer class | True |
The <u:insertFacet /> tag inserts specified facet.
Table 10.13. The <u:insertFacet /> attributes
| Attribute Name | Description | Required |
|---|---|---|
| name | Defines a name of a facet | True |
The <vcp:body /> tag allows to split a template content into parts that are passed to encode() methods and defines when children elements rendering should be invoked:
the template content before the <vcp:body /> tag is inputted into
encodeBegin()methodthe template content after the <vcp:body /> tag is inputted into
encodeEnd()methodon the <vcp:body /> tag the
encodeChildren()method is invoked