Create new RichFaces Documentation Jira issue

This will launch the RichFaces Jira page - to complete your feedback please login if needed, and submit the Jira.
JBoss.orgCommunity Documentation
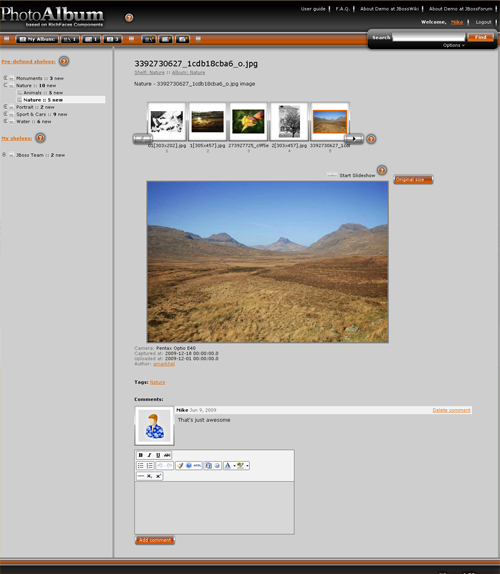
Image View in the Photo Album application is a page where only one image is displayed. In this view you can also browse the current album with the image scroller as well as to switch to slideshow mode. If you are a registered user you can leave comments under the current image.
The Images Scroller implementation in the Photo Album application is basically <a4j:repeat> with the value attribute bound to #{model.selectedAlbum.images}, which is a collection of images of the selected album and the <rich:dataScroller> component tied to the <a4j:repeat> .
The source code you can find in the includes/images/imageScroller.xhtml file. Now let's go deeper into the details. The main component here is <a4j:repeat>:
...

<a4j:repeat value="#{model.selectedAlbum.images}" rows="5"

    var="img" id="repeat" rowKeyVar="rk">


    <a4j:outputPanel layout="block"

        styleClass="preview_box_photo_nav #{model.selectedImage == img ? 'preview_box_photo_current' : 'preview_box_photo_default'}">

        <h:panelGroup layout="block" styleClass="preview_box_photo_80">

            <h:graphicImage styleClass="pr_photo_bg"

                value="/img/shell/frame_photo_80.png" />

            <h:panelGrid cellpadding="0" cellspacing="2">

                <h:panelGroup layout="block">

                    <a4j:mediaOutput element="img"

                        createContent="#{imageLoader.paintImage}"

                        value="#{fileManager.transformPath(img.fullPath, '_small80')}">

                    </a4j:mediaOutput>

                    <br />

                </h:panelGroup>

            </h:panelGrid>

            <h:panelGroup layout="block" styleClass="photo_name">

                <h:outputText value="#{img.name}" />

            </h:panelGroup>

            <h:panelGroup layout="block" styleClass="photo_data">

                <h:outputText value="#{rk + 1}" />

            </h:panelGroup>

        </h:panelGroup>


        <a4j:support event="onclick" rendered="#{model.selectedImage != img}"

            reRender="mainArea,treePanel, imagesTable" action="#{controller.showImage(img)}" />

    </a4j:outputPanel>

</a4j:repeat>

...
Each element of the
<a4j:repeat> has a corresponding <a4j:outputPanel> with the <a4j:mediaOutput> as a nested element. <a4j:mediaOutput> renders the thumbnail of the image. As the rows attribute is set to "5" (rows="5"), only 5 images are displayed on the page at a time.
As you've noticed, the currently selected image in the images scroller has different style, namely: a red frame around thumbnail, which is implemented with this code:
...

<a4j:outputPanel layout="block"

styleClass="preview_box_photo_nav #{model.selectedImage == img ? 'preview_box_photo_current' : 'preview_box_photo_default'}">

...
As you can see from the code snippet, identification of whether the currently selected image is the same image displayed by the <a4j:repeat> is performed in the styleClass, if it returns "true", different style is applied.
Each <a4j:repeat> has a corresponding <a4j:support> configured like this:
...

 <a4j:support event="onclick"

                    rendered="#{model.selectedImage != img}"

                    reRender="mainArea,treePanel, imagesTable"

                    action="#{controller.showImage(img)}" />


...
On every click <a4j:support> calls #{controller.showImage(img)} method that sets the current image, thumbnail of which has just been clicked on. For more details please see Controller.java class.
To implement thumbnails scrolling effect the <rich:datascroller> is attached to the <a4j:repeat>:
...

<rich:datascroller page="#{controller.getPage()}"

    styleClass="image-scroller" lastPageMode="full" for="repeat" reRender="imagesTable"

    boundaryControls="hide" stepControls="hide">

    <f:facet name="pages">

        <h:outputText />

    </f:facet>

    <f:facet name="fastforward">

        <h:graphicImage styleClass="image-scroller-right-arrow"

            value="img/shell/arr_right.png" />

    </f:facet>

    <f:facet name="fastforward_disabled">

        <h:graphicImage styleClass="image-scroller-right-arrow"

            value="img/shell/arr_right_dis.png" />

    </f:facet>

    <f:facet name="fastrewind">

        <h:graphicImage styleClass="image-scroller-left-arrow"

            value="img/shell/arr_left.png" />

    </f:facet>

    <f:facet name="fastrewind_disabled">

        <h:graphicImage styleClass="image-scroller-left-arrow"

            value="img/shell/arr_left_dis.png" />

    </f:facet>

</rich:datascroller>


...
The page attribute identifies which page should be displayed right now. For instance, if you have only 20 images and the current image has the 12th index in the collection, then the 3rd page will be displayed:
...

public Integer getPage(){

        final Integer index = model.getSelectedAlbum().getIndex(model.getSelectedImage());

        return index / 5 + 1;

    }


...
The lastPageMode="full" attribute ensures that 5 thumbnails are always shown on the page. If this attribute hadn't been configured like this, in case the 19th thumbnail out of 20 had been selected then only 2 last thumbnails would have been displayed.
As you can see, <rich:dataScroller> has a slightly different look-and-feel, the trick is in the redefinition of fastforward, fastforward_disabled, fastrewind and fastrewind_disabled facets on which places we display our images. We didn't redefine other facets because they are not rendered to the page which is achieved with boundaryControls="hide" and stepControls="hide attributes of <rich:dataSroller>.
Visit following pages at RichFaces Live Demo for more information, examples and sources on the components used in the application and described in this chapter:
DataTableScrolling page for the <rich:dataScroller> component;
Repeat for the <a4j:repeat> component.