Create new RichFaces Documentation Jira issue

This will launch the RichFaces Jira page - to complete your feedback please login if needed, and submit the Jira.
JBoss.orgCommunity Documentation
The RichFaces CDK allows you to create samples easier as it has been discussed earlier in the "Component usage overview" chapter. Let's create a simple JSF project, called inputDate-sample for example, with the help of the maven-archetype-jsfwebapp archetype.
It is necessary to proceed to your Sandbox directory where you have created the <inputDate> component and launch the following command (all in one line):
mvn archetype:create -DarchetypeGroupId=org.richfaces.cdk -DarchetypeArtifactId=maven-archetype-jsfwebapp -DarchetypeVersion=3.3.3.Final -DgroupId=org.mycompany -DartifactId=inputDate-sample
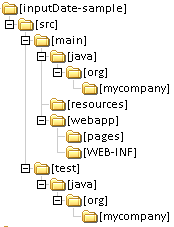
As easy to see a new directory inputDate-sample is created with the predefined JSF project structure:
It should be pointed out that maven-archetype-jsfwebapp archetype creates skeletons of the following files: JSP page, Facelets page, managed bean already registered in the faces-config.xml, complete deployment descriptor (web.xml).
Now it is necessary to edit a JSP page, managed bean skeletons, and add the proper dependency to the pom.xml file of the inputDate-sample project.
You should proceed to the inputDate-sample/src/main/webapp/pages directory and edit index.jsp file. You should add a form with our <inputDate> component.
Here is the full page (index.jsp):
<%@ taglib uri="http://java.sun.com/jsf/html" prefix="h"%>

<%@ taglib uri="http://java.sun.com/jsf/core" prefix="f"%>

<%@ taglib uri="http://mycompany.org/inputDate" prefix="my"%>

<html>

    <head>

        <title>My inputDate</title>

    </head>

    <body>

        <f:view>

            <h:form>

                <my:inputDate value="#{bean.text}">

                    <f:facet name="caption">

                        <f:verbatim>

                            Calendar:

                        </f:verbatim>

                    </f:facet>

                </my:inputDate>

                <h:commandButton value="Submit" />

            </h:form>

        </f:view>

    </body>

</html>
In order to build this application, you should edit already created managed bean:
package org.mycompany;


public class Bean {


    private String text = null;


    public Bean() {


    }


    public String getText() {

        return text;

    }


    public void setText(String text) {

        this.text = text;

    }

}
In order to use any component on a page (JSF, Facelets, RichFaces, etc.) you should add necessary libraries to the JSF project. Sometime it takes a lot of time to get all the dependencies of a particular library. You should also prevent versions conflict if the library already exists on a server. Now we are going to add necessary libraries to the JSF project, deploy and run project on a server. Maven will help us.
Maven is a high-level, intelligent build and deployment tool designed to take much of the hard work out of the build process. In Maven's Project Object Model (POM) file we could declare necessary dependent libraries and Maven plugins used to manage all parts of the build process.
Our <inputDate> component depends on JSF and RichFaces libraries. If you declare inputDate dependency in the inputDate-sample project's POM all the necessary libraries will be added automatically. Therefore you need to delete richfaces-ui artifact out of dependencies first and then add only one inputDate dependency:
...

<dependency>

    <groupId>org.mycompany</groupId>

    <artifactId>inputDate</artifactId>

    <version>1.0-SNAPSHOT</version>

</dependency>

...
Now it is possible to build the inputDate-sample project with the help of the following command:
mvn install
The final step is to deploy and run the project on a server. One of the convenient features of Maven is the Jetty plugin. Jetty is an open-source web server implemented entirely in Java. In order to deploy and run the project on the Jetty you should take the following steps:
add the maven-jetty-plugin to the pom.xml:
...

<plugin>

    <groupId>org.mortbay.jetty</groupId>

    <artifactId>maven-jetty-plugin</artifactId>

    <version>6.1.5</version>

    <configuration>

        <scanIntervalSeconds>10</scanIntervalSeconds>

        <connectors>

            <connector implementation="org.mortbay.jetty.nio.SelectChannelConnector">

                <port>8080</port>

                <maxIdleTime>60000</maxIdleTime>

            </connector>

        </connectors>

    </configuration>

</plugin>

...
launch the following command in the inputDate-sample directory:
...

mvn jetty:run

...
after the scanner has been started point your browser at http://localhost:8080/inputDate-sample.
That' all! Your sample JSF project has been created.
Here you can find the whole pom.xml file.