Now that I have succesfully brought the jBPM 3.1 console app up and running on Websphere 6.1 as you can see from Jbpm31OnWAS61, I want to try the same for jBPM 3.2.2
Environment:
Component | Note | |
|---|---|---|
Websphere Application Server 6.1.0.0 | downloaded the free trial version from http://www.ibm.com/developerworks/downloads/ws/was/index.html | |
jBPM 3.2.2 | downloaded the jbpm-jpdl-3.2.2 from http://labs.jboss.com/jbossjbpm/downloads/ and extracted it to a directory, which will further be refered to as '$JBPM32'. | |
DB2 v9.5.0.808 | ok, as I'm already installing on IBMs app server, I will also go for their db ! again, I'm using a free trial version from http://www-306.ibm.com/software/data/db2/9/download.html | |
Windows XP Professional | - |
1. Prepare the jBPM 3.2 schema on DB2
Using DB2s 'Control Center' I created a new database 'JBPM32' on my DB2 instance, and gave the user 'jbossjbpm' all rights to manipulate it. Some jBPM tables exceed the default pagesize on DB2, so before you continue with the creation of the tables, make sure to follow the hints from JbpmOnDB2.
Now I changed into the folder containing the scripts to create the database schema, for db2 this is:
cd $JBPM32/db/jbpm.jpdl.db2.sql
Note: right now all lines are missing the ending semicolon (, which has to be appended manually at the moment.
Started a DB2 shell from the Control Center and connected to the fresh JBPM32 database:
connect to JBPM32 user jbossjbpm using jbossjbpm;
Pasted the content from the above mentioned script into the shell and executed the SQL statements.
Ok, that created the db schema, to really get started I also inserted the default demo users. Just copy the sql statements below into the DB2 shell and execute it again:
INSERT INTO JBPM_ID_USER VALUES(1,'U','user','user@sample.domain','user'); INSERT INTO JBPM_ID_USER VALUES(2,'U','manager','manager@sample.domain','manager'); INSERT INTO JBPM_ID_USER VALUES(3,'U','admin','admin@sample.domain','admin'); INSERT INTO JBPM_ID_USER VALUES(4,'U','shipper','shipper@sample.domain','shipper'); INSERT INTO JBPM_ID_GROUP VALUES(1,'G','sales','organisation',NULL); INSERT INTO JBPM_ID_GROUP VALUES(2,'G','manager','security-role',NULL); INSERT INTO JBPM_ID_GROUP VALUES(3,'G','hr','organisation',NULL); INSERT INTO JBPM_ID_GROUP VALUES(4,'G','admin','security-role',NULL); INSERT INTO JBPM_ID_GROUP VALUES(5,'G','user','security-role',NULL); INSERT INTO JBPM_ID_MEMBERSHIP VALUES(1,'M',NULL,NULL,2,2); INSERT INTO JBPM_ID_MEMBERSHIP VALUES(2,'M',NULL,NULL,2,4); INSERT INTO JBPM_ID_MEMBERSHIP VALUES(3,'M',NULL,NULL,3,4); INSERT INTO JBPM_ID_MEMBERSHIP VALUES(4,'M',NULL,NULL,2,5); INSERT INTO JBPM_ID_MEMBERSHIP VALUES(5,'M',NULL,NULL,1,5); INSERT INTO JBPM_ID_MEMBERSHIP VALUES(6,'M',NULL,NULL,4,3); INSERT INTO JBPM_ID_MEMBERSHIP VALUES(7,'M',NULL,NULL,4,5); INSERT INTO JBPM_ID_MEMBERSHIP VALUES(8,'M',NULL,NULL,3,5); INSERT INTO JBPM_ID_MEMBERSHIP VALUES(9,'M',NULL,NULL,3,3); INSERT INTO JBPM_ID_MEMBERSHIP VALUES(10,'M',NULL,NULL,2,3); INSERT INTO JBPM_ID_MEMBERSHIP VALUES(11,'M',NULL,'boss',2,1); INSERT INTO JBPM_ID_MEMBERSHIP VALUES(12,'M',NULL,NULL,1,1);
If you have come this far, well done, your database is prepared now
2. Assemble a customized version of the jbpm-console.war that can be deployed on WAS 6.1
Since this is probably the most tricky part to get it working, I have made a customized version of the $JBPM32\deploy\build.xml ant build script, with a customized target that roughly does the following:
include the right libs
define the right jBPM and Hibernate configuration settings
get the logging configuration right (this helped me a lot: http://www.mail-archive.com/commons-user@jakarta.apache.org/msg16833.html//www.mail-archive.com/commons-user@jakarta.apache.org/msg16833.html)
make adjustments to the security settings to match the peculiarities of Websphere
I will not go into the details of the configuration changes here, as it should be obvious by looking at the new task customize.console.for.websphere. To start with, download the 'jbpm32_deploy_websphere_war_build.xml' file attached to this wiki, open up the original build file, $JBPM32\deploy\build.xml, and insert the contents of the downloaded file somewhere inside the tags.
Now you can execute the new target using the command line:
cd $JBPM32\deploy $JBPM32\deploy > ant customize.console.for.websphere ... BUILD SUCCESSFUL $JBPM32\jbpm > dir customized\jbpm-console-was.war ... 24.01.2008 10:03 7.536.642 jbpm-console-was.war
3. Create a DB2 datasource in Websphere
How to do this using the administrative cosole is pretty much straightforward and very well documented in the WAS documentation , such as in http://publib.boulder.ibm.com/infocenter/wasinfo/v6r1//topic/com.ibm.websphere.zseries.doc/info/zseries/ae/tdat_tccrtprovds.html
I created a datasource of name 'Jbpm32DS' and JNDI name 'jdbc/Jbpm32DS'.
4. Deploy using the Websphere Console
4.1 Start deployment: Applications > Install New Application
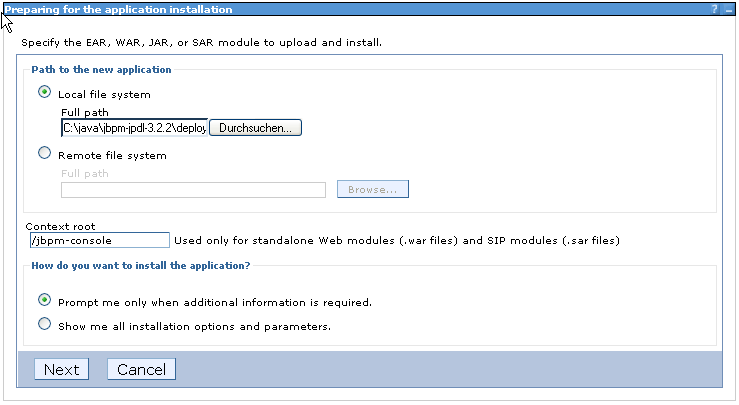
As shown on the above figure, define the path to the war - in our case $JBPM32\deploy\customized\jbpm-console-was.war and a context root, for which I've chosen '/jbpm-console', hit 'Next'
4.2 Left the default settings on the rest of the wizards screens, so you can hit 'Next', 'Next', 'Next', 'Finish'
4.3 The installation has hopefully succeeded: 'Application jbpm-console-was_war installed successfully.', after that I hit 'Save' to make these config changes permanent.
4.4 Now 'Applications > Enterprise Applications' list my newly deployed 'jbpm-console-was_war', not yet started. Before this should be started, it is very important to change the classloader settings. Click on the linked 'jbpm-console-was_war' > 'Class loading and update detection' and change the settings to PARENT last:
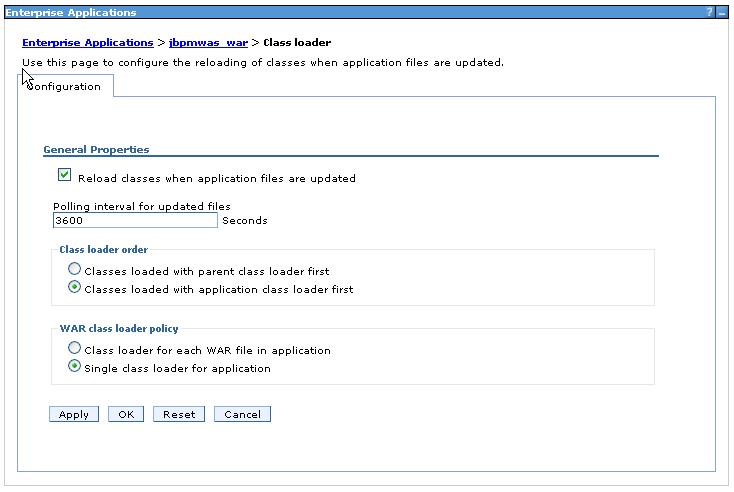
After defining an interval as well I could persist these changes with 'OK', and 'Save' afterwards.
4.5 Start the application
4.6 After it has started, it should be available, eg. at http://localhost:9080/jbpm-console/index.jsp, depending on your machine name and Virtual Host port settings.
Now you should at least see something of the console, most likely already the first screen with the list of processes. In that case, the security settings don't work yet.
5. Set up security to get the authentication/authorization information from the jBPM database
Setting up a custom registry that uses the jBPM database wasn't that easy, but nevertheless I got it working somehow. It might not be the best solution, as I'm still not too familiar with Websphere, though. Note: Please follow these steps with caution, as it is easy to be kicked out completely from the profile, better make a copy of $WebSphere\AppServer\profiles$profilename\config\cells$cellname\security.xml file!
I used the following resources to get this done:
http://www.informatik.fh-wiesbaden.de/~knauf/SWTVertiefung2005/websphere/security/index.html (German only)
http://www.redbooks.ibm.com/redpieces/pdfs/sg246316.pdf Chapter 2.3.1
What is not really nice is that, after going through the following configuration changes, the authentication for all applications in the current Websphere is based on the custom registry, which looks up the users/roles from the jBPM database, and that all apps are using SSO now, but oh, well, sigh... that's how far I got.
To begin with, I adapted the 'Custom Registry' example from the Security Redbook (the original file is available at ftp://www.redbooks.ibm.com/redbooks/SG246316/sg246316.zip), and the source including an ant build file is attached to this wiki as 'jBPM_CustomWebsphereRegistry.zip'. Just extract it somewhere on your hard drive, check the properties pointing to your Websphere and DB2 installation:
   <property name="db2driver" value="c:/Programme/IBM/SQLLIB/java/db2jcc.jar"></property>

   <property name="was61.dir" value="c:/Programme/IBM/WebSphere/AppServer"></property>
and once this is setup, calling ant should compile and deploy the custom registry to Websphere by copying files to the $was61.dir}/lib/ext directory.
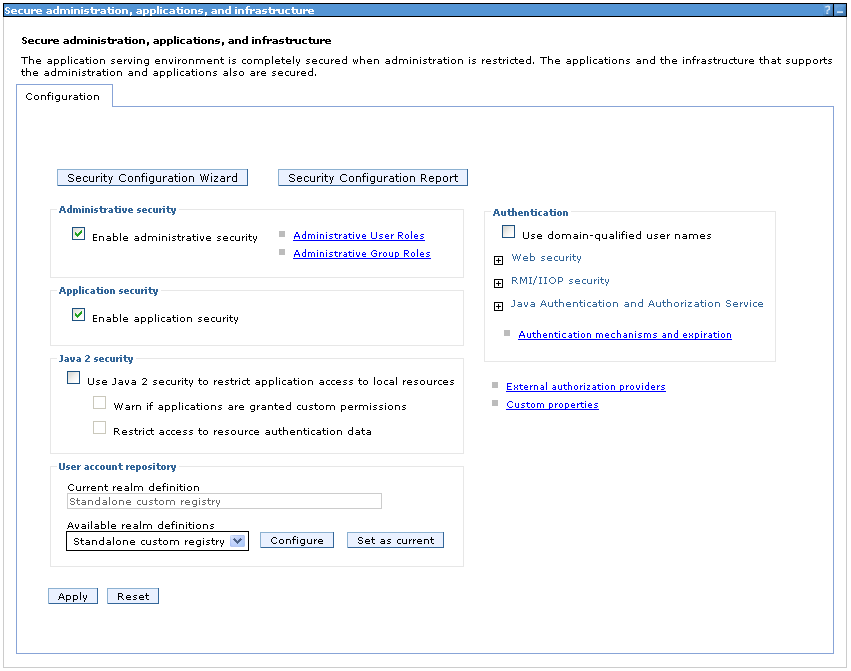
5.1 Enable application security
Go to 'Security > Secure administration, applications, and infrastructure' and use the settings as shown below:
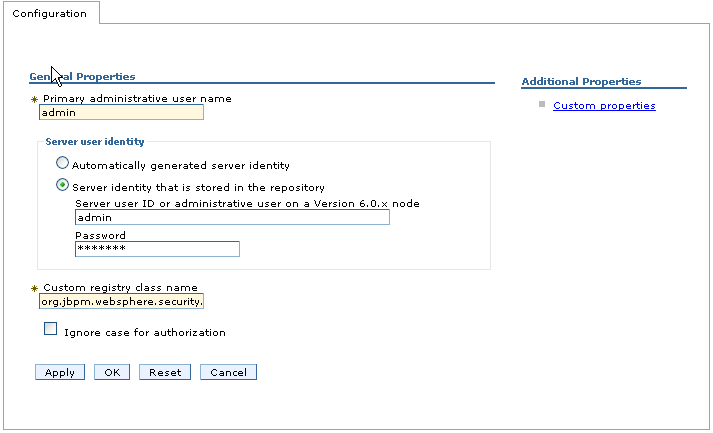
5.2 Define 'Standalone custom registry'
Once you have choosen 'User account repository > Standalone custom registry', click 'Configure' and make sure to use the classname of your custom user registry under 'Custom registry class name': org.jbpm.websphere.security.JbpmUserRegistry
5.3 Define custom properties
Use the 'Custom properties' link to define the settings for your DB2 hosted jBPM database schema as shown below:
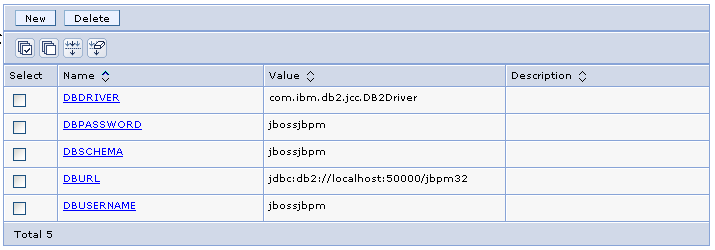
After you have saved the settings you have to restart the server to activate the custom security settings.
6. Map users to security roles for jBPM web app
Now if you try to hit the deployed jBPM web-console, you will most likely receive an HTTP 403 error. To get around this, the users have to be mapped to the 'admin' role (defined in web.xml of the application).
Go to 'Enterprise Applications > jbpm-console-was_war > Security role to user/group mapping', select the 'admin' role and click 'Look up users'. This should take you to a screen where you can 'Search' the user registry for existing users. If you hit 'Search' the users currently in the jBPM user table (user,manager,admin,shipper) should be filled in the 'Available' box. Use the right arrows to get them into the 'Selected' box. After you have hit 'Ok', you should be returned to the first security screen, now with the selected users in the 'Mapped users column':
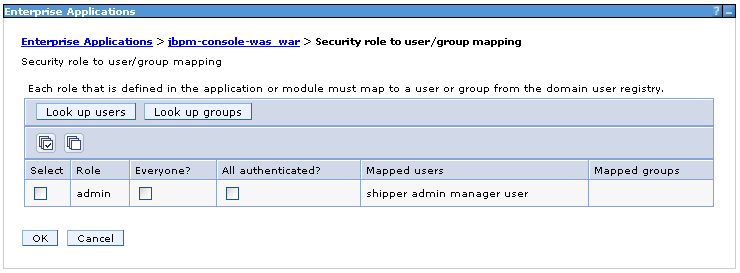
Save your changes and try to browse to the jbpm-console web application:
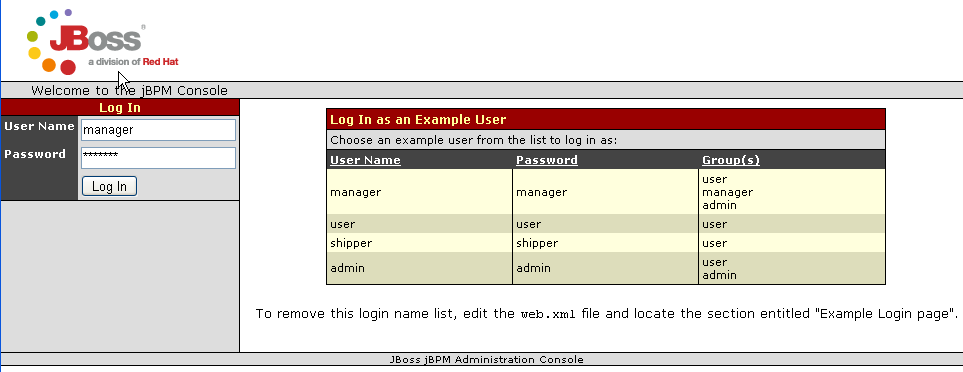
If everything worked out, you should see the login page, and you should also be able to login!
-
Back to JbpmOnWebsphere | JbpmServerCompatibility


Comments