Debugging JGroups connectivity problems with Wireshark
-
Introduction
-
JGroups requires that certain classes of messages (UDP multicast, point-to-point UDP and point-to-point TCP) be successfully exchanged between group members in order achieve correct operation.
The configuration of process-based firewalls and router-based firewalls can prevent these messages from being successfully transmitted between group members and so prevent group memers from either seeing each other at all or interacting correctly. In such cases, debugging the network configurations is necessary.
Wireshark(formerly, Ethereal) is an open-source network protocol analyzer which can be used to observe the network packets being exchanged between group members, and can be very helpful in debugging JGroups network configuration problems.
In this document, i'll present an example of using Wireshark to debug network connectivity problems on a small two host network.
-
Background
-
In this section, i'll present some background needed to be able to follow along with the debugging example. The background includes:
configuration of the example network
relevant JGroups applications and utilities
Wireshark
Linux firewalls (iptables)
The network configuration
My example network consists of the following:
one Dell Latitude D610 laptop running Fedora Core 6
one IBM Lenovo T60 laptop running Fedora 8
one D-Link DI-640UP Ethernet Broadband Router
Each of the laptops is connected via an Ethernet patch cable to a LAN port on the router. The two laptops, together with the router, form a small, two host LAN. The router is in turn connected to a cable modem providing access to the Internet via its WAN port.
Router configuration
The router can be configured via a graphical user interface:
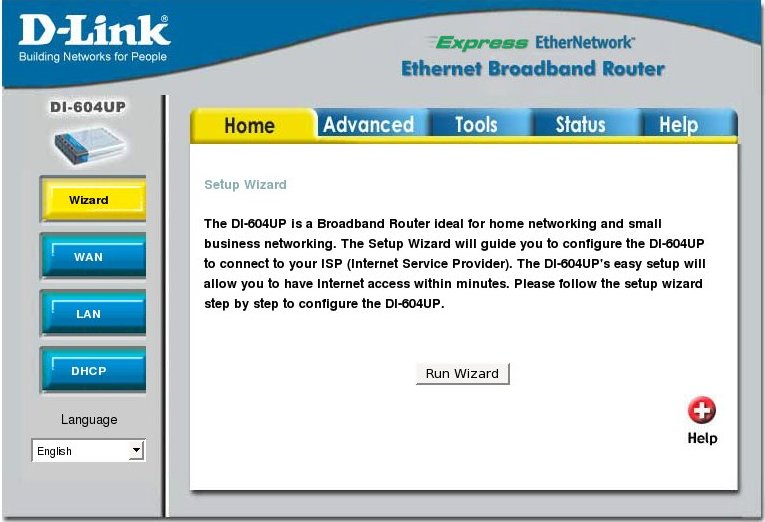
This particular router has options for setting up firewall rules, configuring IP address of hosts attached to it either statically or dynamically, and many other options.
The router has been set up to allocate IP addresses to the hosts attached to it dynamically using DHCP. The IP address of the router is 192.168.0.1, the IP address of host A is 192.168.0.100, and the address of host B is 192.168.0.101. The (network) address of the LAN is 192.160.0.0. Aside from these changes, no other changes were made to the default router configuration.
JGroups applications and debugging utilities
In what follows, we'll be making use of a sample JGroups application and two JGroups debugging utilities to aid in debugging.
Draw
The JGroups application org.jgroups.demos.Draw is a good application to use for testing JGroups connectivity, as its easy to use, and provides a representative JGroups application. To start the Draw application on host A:
Host A:> java -Djava.net.preferIPv4Stack=true -Djgroups.bind_addr=192.168.0.100 org.jgroups.demos.Draw -props udp.xml
You will have to make sure that JGroups is installed and the CLASSPATH variable is set up to point to the JGroups classes. Here is what I use with the binary distribution of JGroups:
JGROUPS_HOME=/tmp/JGroups
CLASSPATH=$JGROUPS_HOME/jgroups-all.jar:$JGROUPS_HOME/commons-logging.jar:$JGROUPS_HOME/log4j.jar
export CLASSPATH
Because host A and host B are connected to other networks (e.g. VPN tunnel) besides the small LAN, I want to make sure that they are directed to exchange messages with each other using network 192.168.0.0. To do this, the bind_addr parameter is specified when starting the JGroups Draw application. The bind_addr parameter should be an IP address attached to the network you want the group members to use for communicating with each other. In this case, specifying a bind_addr 192.168.0.100 makes sure that Draw on host A listens on interface 192.168.0.100 for any JGroups related messages. Similar measures need to be taken for Host B. The props parameter is set to udp.xml so that UDP based multicast is used to communicate between group members, as it is multicast which we want to test. The system property java.net.preferIPv4Stack=true directs JGroups to use IPv4 IP addresses, as opposed to IPv6 addresses.
Multicast testing utilities
JGroups provides two utility programs which permit sending simple multicast messages between hosts: org.jgroups.tests.McastSenderTest and org.jgroups.tests.McastReceiverTest. Start one instance of the receiver on one host, and one instance of the sender on the other host. As before, when running on a multi-homed host (a host having more than one network interface, and so more than one IP address) bind_addr is used to specify the IP address of the host on the network to which the other group member is attached. In this case, this is the IP address of the host(s) on our small LAN. mcast_addr can be used to specify a different multicast address. Leave this parameter out to accept the default (228.10.10.10) if you don't need to use a different multicast address. Use 5555 for the multicast port.
After starting the sender and receiver instances, to send a multicast message from sender to receiver, type in a line of text at the sender prompt and press enter. If network connectivity has been set up correctly, you should see two things: the original text you sent printed on the console at the receiver and (ii) a confirmation reply printed on the console at the sender. This is illustrated below:
Host A:> java org.jgroups.tests.McastReceiverTest -bind_addr 192.168.0.100 -mcast_addr 224.10.10.10 -port 5555
Socket=0.0.0.0/0.0.0.0:32770, ttl=32, bind interface=/192.168.0.100
abc [sender=192.168.0.101:32770]
Host A:>
Host B:> java org.jgroups.tests.McastSenderTest -bind_addr 192.168.0.101 -mcast_addr 224.10.10.10 -port 5555
Socket=0.0.0.0/0.0.0.0:5555, bind interface=/192.168.0.101
Host B:> abc
Host B:> << Received response from 192.168.0.100:5555: Hello from Bela
Host B:>
As we will see, if there are network connectivity problems, you may see no messages received at the receiver, or (ii) a message received at the receiver but no reply received at the sender.
Wireshark
Wireshark is a freely available open source, network protocol analyzer. Please see http://www.wireshark.org/ for instructions on how to download and install Wireshark for your platform.
Wireshark is useful for debugging JGroups network connectivity problems as it can capture all packets exchanged between a group member and its peers, and allow inspection of those packets. Often times, packets representing network connectivity errors are exchanged between group members, but are not visible at the user interface level. Wireshark allows us to see such messages.
Upon startup, Wireshark displays its user interface:
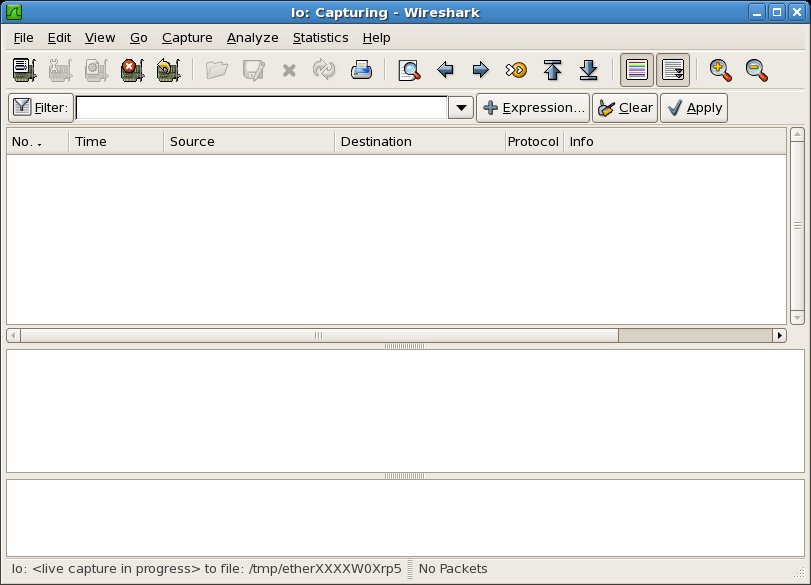
The user interface is divided into three windows, starting from the top: a packet list pane, which lists all packets received at the interface; a packet details pane, showing the packet details for a selected packet in the packet list pane; and a packet bytes pane, showing the bytes in packet headers. We shall see examples of these in what follows.
Using Wireshark to capture packets received by (or sent from) a group member is easy:
start Wireshark on the host on which you will start the group member
using Capture -> Interfaces, start collecting packets. You will be asked to choose a network interface from the set of interfaces available on your host (for example, I have a choice of tunnel0, eth0, loopback, and any). Choose the interface which the group member will be listening on (in the case of the example, eth0, which has IP address 192.168.0.100).
start the JGroups application on the host using that same interface
interact with the JGroups application. In the Wireshark display, you will see the packets being captured in real-time.
using Capture -> Stop, stop the capture of packets
if desired, save the capture session to a file for later analysis
Wireshark by default captures all packets passing through a selected interface. Using filters, you can restrict the set of packets captured to multicast only, UDP only, TCP from a particular host, and so on. See the Wireshark documentation for more information and examples.
iptables
Linux provides an administrative tool called iptables to "set up, maintain, and inspect the tables of IP packet filter rules in the Linux kernel". Each host running Linux will have a particular configuration of IP packet filter rules, and the configuration of these rules may prevent JGroups group members from correctly receiving packets sent to them.
There are a few uses of the iptables command which are especially useful. You need to be logged in as the superuser to execute these commands.
Listing the current iptables configuration
Here is the listing of the default table of IP packet rules for Fedora:
Host A:# /sbin/iptables -L -n -v
Chain INPUT (policy ACCEPT 0 packets, 0 bytes)
 pkts bytes target               prot opt in     out     source               destination
 333K  222M RH-Firewall-1-INPUT  all  --  *      *       0.0.0.0/0            0.0.0.0/0

Chain FORWARD (policy ACCEPT 0 packets, 0 bytes)
 pkts bytes target               prot opt in     out     source               destination
    0     0 RH-Firewall-1-INPUT  all  --  *      *       0.0.0.0/0            0.0.0.0/0

Chain OUTPUT (policy ACCEPT 305K packets, 29M bytes)
 pkts bytes target     prot opt in     out     source               destination

Chain RH-Firewall-1-INPUT (2 references)
 pkts bytes target     prot opt in     out     source               destination
 5998 1915K ACCEPT     all  --  lo     *       0.0.0.0/0            0.0.0.0/0
 1099  146K ACCEPT     icmp --  *      *       0.0.0.0/0            0.0.0.0/0           icmp type 255
    0     0 ACCEPT     esp  --  *      *       0.0.0.0/0            0.0.0.0/0
    0     0 ACCEPT     ah   --  *      *       0.0.0.0/0            0.0.0.0/0
    0     0 ACCEPT     udp  --  *      *       0.0.0.0/0            224.0.0.251         udp dpt:5353
    0     0 ACCEPT     udp  --  *      *       0.0.0.0/0            0.0.0.0/0           udp dpt:631
    0     0 ACCEPT     tcp  --  *      *       0.0.0.0/0            0.0.0.0/0           tcp dpt:631
 324K  220M ACCEPT     all  --  *      *       0.0.0.0/0            0.0.0.0/0           state RELATED,ESTABLISHED
    0     0 ACCEPT     tcp  --  *      *       0.0.0.0/0            0.0.0.0/0           state NEW tcp dpt:22
 2124 81930 REJECT     all  --  *      *       0.0.0.0/0            0.0.0.0/0           reject-with icmp-host-prohibited
The default table of IP packet rules contains four chains: chain INPUT processes packets coming into the host; chain OUTPUT processes packets leaving the host; chain FORWARD processes packets which are being routed through the host. There is also a user-defined chain RH-Firewall-1-INPUT - more about this shortly.
Each chain consists of an ordered set of rules. Each rule consists of a packet specification and a target. As a packet passes through a chain, each rule is tested to see if its packet specification matches the packet being processed: if it does, the target is performed on the packet; if it does not, the next rule in the chain is is tested.
Targets include:
ACCEPT - allow the packet to pass through the firewall
DROP - drop the packet (i.e. don't allow it to pass through the firewall)
REJECT - drop the packet and return a specified error message to the sender
Packet specifications can make use of the following parameters to specifiy classes of packets :
prot - protocol type (value of all means no restriction)
opt - options
in - input interface packet arrives on (value of asterisk means no restriction)
out - output interface packet is sent on (value of asterisk means no restriction)
source - source IP address of packet (value of 0.0.0.0/0 means no restriction)
dest - destination IP address of packet (value of 0.0.0.0/0 means no restriction)
In the Fedora iptables configuration above, both the INPUT chain and the FORWARD chain contain a single rule:
 pkts bytes target               prot opt in     out     source               destination
            RH-Firewall-1-INPUT  all  --  *      *       0.0.0.0/0            0.0.0.0/0
This states that packets using any protocol (prot = all), on any input interface (in = asterisk), on any output interface (out = asterisk), from any source (source = 0.0.0.0/0) and to any destination (dest = 0.0.0.0/0) will be passed onto the user-defined chain RH-Firewall-1-INPUT (target). This effectively makes the chain RH-Firewall-1-INPUT a centralized location for all our firewall rules.
A quick and dirty interpretation of the chain RH-Firewall-1-INPUT is:
accept all packets arriving on the loopback interface
accept all ICMP packets (matches all ICMP message types)
all esp packets (packets from the Encap Security Protocol)
accept all ah packets (packets from the Authentication Header protocol)
all UDP packets destined for the multicast address 224.0.0.251:dest_port=5353 (packets from Multicast DNS service)
accept all UDP packets destined for any IP address and dest_port=631 (packets from Internet Printing Protocol service)
accept all TCP packets destined for any IP address and dest_port=631 (packets from Internet Printing Protocol service)
accept all packets using any protocol which have a connection state of RELATED or ESTABLISHED (it seems that this rule disallows creating new connections in general - but will allow connection-oriented traffic from existing connections)
accept all TCP packets related to the creation of ssh connections (tcp packets destined for port 22)
reject all other packets, dropping them and returning an ICMP host-prohibited reply message
Adding a rule to allow UDP multicast packets through to a process
I include this rule as it will become important later in the discussion.
Host A:# /sbin/iptables -I RH-Firewall-1-INPUT 5 -p udp -d 224.0.0.0/4 -j ACCEPT
This rule says insert (-I) into the chain RH-Firewall-1-INPUT in the 5th position a new rule. The rule only applies to packets with protocol udp (-p udp) which have a destination in the range 224... through 239... (-d 224.0.0.0/4) and if the packet matches this specification, it should be allowed through the firewall (-j ACCEPT).
The expression 224.0.0.0/4 refers to all UDP multicast addresses (in the range 224.0.0.0 to 239.255.255.255) because 224.0.0.0/4 represents all addresses which match 224.0.0.0 matches on the first 4 bits, according to the iptables documentation. 224 = 0xE0, 239 = 0xEF, and so all IP addresses between 224.0.0.0 and 239.255.255.255 match 224.0.0.0 on the first 4 bits.
Adding a rule to allow TCP packets in when their destination is on network 192.168.0.0
Host A:# /sbin/iptables -I RH-Firewall-1-INPUT 5 -p tcp -d 192.168.0.0/24 -j ACCEPT
Saving the iptables configuration
Host A:# /etc/init.d/iptables save
Saving firewall rules to /etc/sysconfig/iptables:          [  OK  ]
Any changes to IP tables take effect immediately (does not require a reboot).
-
The Example
-
Stage 1: Using Draw on the 'default' configuration
In this first stage, we consider the brhaviour of the Draw application using the default iptables configurations on Fedora, as well as the default settings on the router.
Symptoms of problem
Starting up an instance of Draw on Host A and Host B, the two instances both display a group membership of 1. Furthermore, drawing lines on one instance do not appear on the other instance. No error messages appear on the console.
Diagnosing with McastSenderTest and McastReceiverTest
In order to simplify the situation, start up instances of McastReceiverTest and McastSenderTest on the two hosts, to see if a simple multicast between the two hosts works. I saw the following output appearing at the consoles for Host A and Host B:
Host A:> java org.jgroups.tests.McastReceiverTest -bind_addr 192.168.0.100 -mcast_addr  224.10.10.10 -port 5555
Socket=0.0.0.0/0.0.0.0:5555, bind interface=/192.168.0.100
Host B:> java org.jgroups.tests.McastSenderTest -bind_addr 192.168.0.101 -mcast_addr 224.10.10.10 -port 5555
Socket=0.0.0.0/0.0.0.0:32770, ttl=32, bind interface=/192.168.0.101
> abc
In this case, neither the message text "abc" appears at the receiver, nor does the reply message appear at the sender. McastSenderTest and McastReceiverTest seem indicate that there is no communication between the sender and receiver process. Further, there are no error messages appearing on the console.
Diagnosing with McastSenderTest and McastReceiverTest and Wireshark
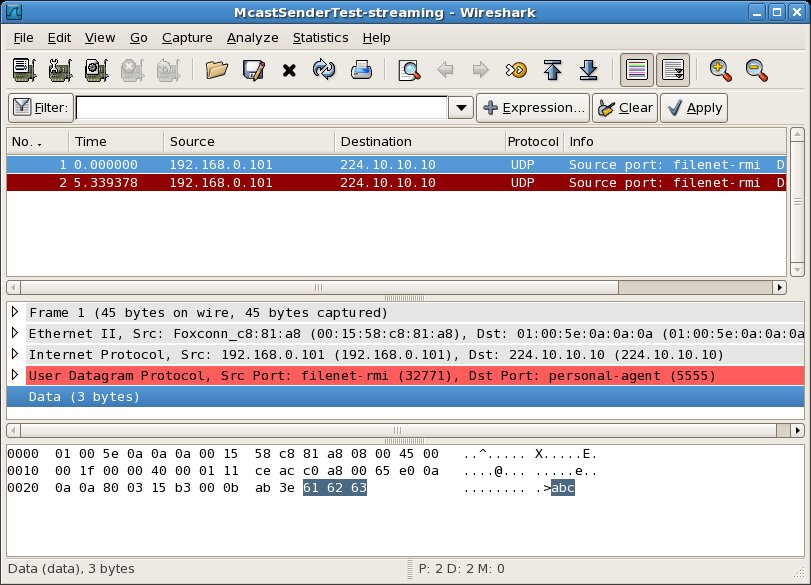
Performing the same test with a Wireshark instance capturing packets on each host gives the following packet traces:
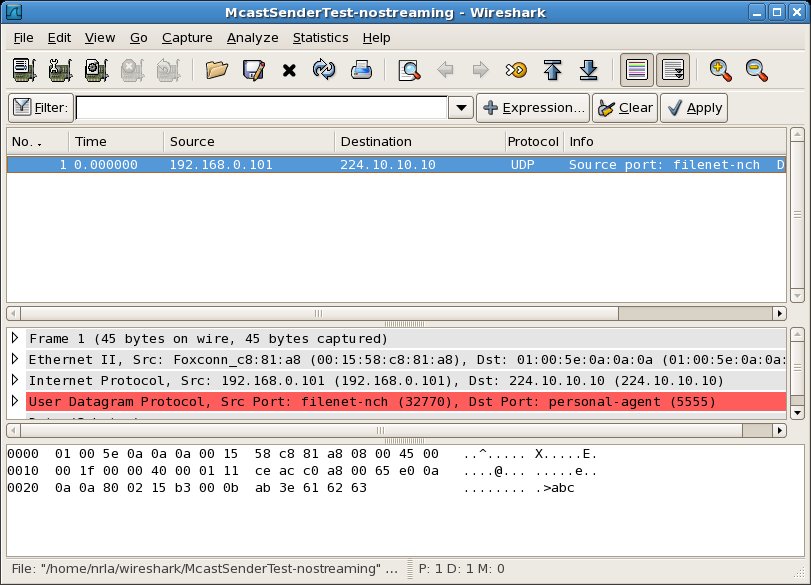
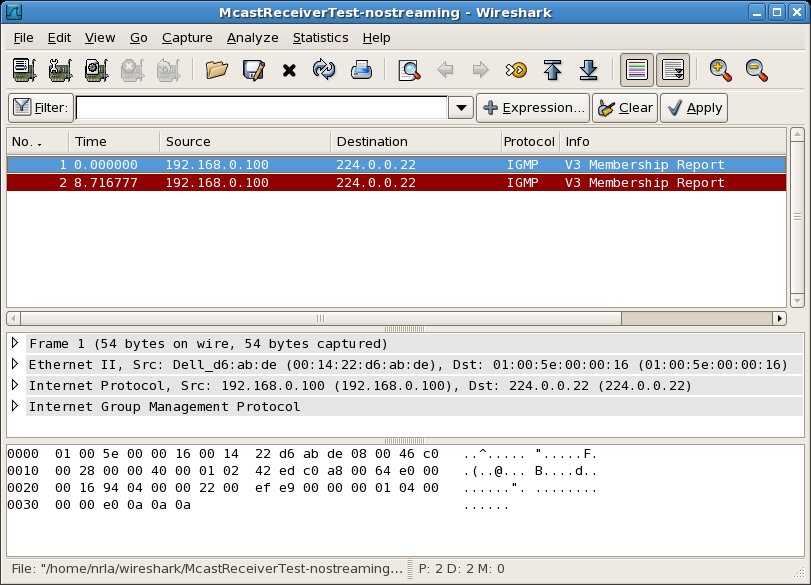
From the capture session at the sender, we see in the packet list pane that host B sent a single multicast UDP packet from itself (source: 192.168.0.101) to the multicast group 224.10.10.10 (destination: 224.10.10.10). In the packet bytes pane, you even can see the payload of "abc" which was sent with the message.
On the other hand, from the capture session at the receiver, the packet list pane only shows that Host A has sent IGMP control messages from itself (source: 192.168.0.100) to the multicast group 224.10.10.10 (destination: 224.10.10.10). IGMP control messages do not concern us here. What does concern us is that we don't see UDP packets appearing at Host A with source 192.168.0.101 and destination 224.10.10.10.
At this stage, I suspected that the router, which lies between the two hosts, was somehow not letting the multicast packets through from Host B to Host A.
Checking the router configuration
I had a look through the router configuration options and found an option "Multicast Streaming" which seemed to relate to how the router deals with multicast packets, and which was disabled by default:
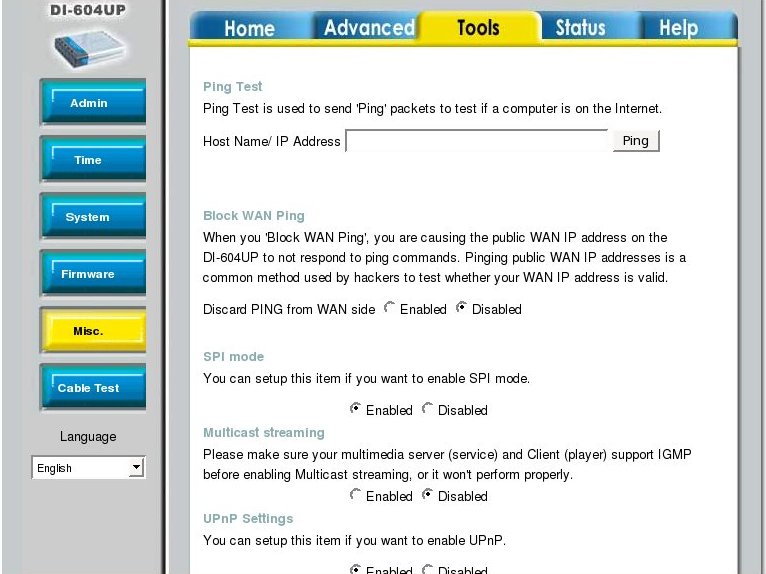
I enabled the "Mulicast Streaming" option, saved the router configuration and went on to repeat the test with the new router configuration.
Stage 2: Using Draw with UDP multicast enabled on the router
With the new router configuration, we start the same debug cycle as before.
Diagnosing with McastSenderTest and McastReceiverTest
The following output appears at the consoles for Host A and Host B:
Host A:> java org.jgroups.tests.McastReceiverTest -bind_addr 192.168.0.100 -mcast_addr  224.10.10.10 -port 5555
Socket=0.0.0.0/0.0.0.0:5555, bind interface=/192.168.0.100
Host B:> java org.jgroups.tests.McastSenderTest -bind_addr 192.168.0.100 -mcast_addr 224.10.10.10 -port 5555
Socket=0.0.0.0/0.0.0.0:32770, ttl=32, bind interface=/192.168.0.101
> abc
> def
There is no change in the console output with the new router configuration.
Diagnosing with McastSenderTest and McastReceiverTest and Wireshark
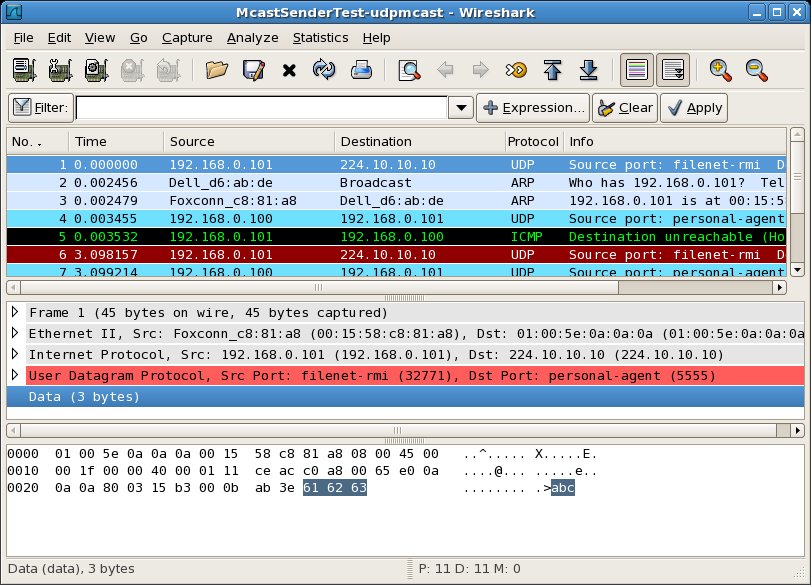
We dig deeper and again use Wireshark to capture a trace of the packets received. Here is what we see:

Something has changed at the packet level view: we now see that the UDP packets sent by Host B are now arriving at Host A. That is, in the packet list pane on Host A, we see UDP packets from source 192.168.0.101 and destination 224.10.10.10. We can also see in the bytes pane for the highlighjted packet the payload "abc". So, by changing the router configuration, some progress has been made. But still, McastReceiverTest is still not displaying the received packet on the console. Why not?
We know the multicast packets are arriving at the host, as we can see them in the packet list pane, captured by Wireshark. Our next guess is that the packets are being discarded by the Linux firewall on Host A. We now need to take a closer look at the default iptables setup on Fedora.
Examining the default iptables
Returning to the discussion of the default iptables configuration on Fedora, we see that there is no rule in the chain RH-Firewall-1-INPUT which specifically allows UDP multicast packets (those with a destination between 224.0.0.0 and 239.255.255.255) through the firewall. Thus, such packets will be rejected.
Therefore, we need to add a rule which allows such multicast packets through. The rule was presented as an example earlier:
Host A:# /sbin/iptables -I RH-Firewall-1-INPUT 5 -p udp -d 224.0.0.0/4 -j ACCEPT
We add it at position 5 in the chain RH-Firewall-1-INPUT so that it appears just before the existing rule 5 which also applies to multicast addresses. The existing rule 5 will become rule 6. It turns out that the new rule we are adding allows in all multicast traffic, and so rule 6 is no longer necessary.
The new rules should now look like:
Host A:# /sbin/iptables -L -n -v
Chain INPUT (policy ACCEPT 0 packets, 0 bytes)
 pkts bytes target               prot opt in     out     source               destination
 333K  222M RH-Firewall-1-INPUT  all  --  *      *       0.0.0.0/0            0.0.0.0/0

Chain FORWARD (policy ACCEPT 0 packets, 0 bytes)
 pkts bytes target               prot opt in     out     source               destination
    0     0 RH-Firewall-1-INPUT  all  --  *      *       0.0.0.0/0            0.0.0.0/0

Chain OUTPUT (policy ACCEPT 305K packets, 29M bytes)
 pkts bytes target     prot opt in     out     source               destination

Chain RH-Firewall-1-INPUT (2 references)
 pkts bytes target     prot opt in     out     source               destination
 5998 1915K ACCEPT     all  --  lo     *       0.0.0.0/0            0.0.0.0/0
 1099  146K ACCEPT     icmp --  *      *       0.0.0.0/0            0.0.0.0/0           icmp type 255
    0     0 ACCEPT     esp  --  *      *       0.0.0.0/0            0.0.0.0/0
    0     0 ACCEPT     ah   --  *      *       0.0.0.0/0            0.0.0.0/0
    0     0 ACCEPT     udp  --  *      *       0.0.0.0/0            224.0.0.0/4
    0     0 ACCEPT     udp  --  *      *       0.0.0.0/0            224.0.0.251         udp dpt:5353
    0     0 ACCEPT     udp  --  *      *       0.0.0.0/0            0.0.0.0/0           udp dpt:631
    0     0 ACCEPT     tcp  --  *      *       0.0.0.0/0            0.0.0.0/0           tcp dpt:631
 324K  220M ACCEPT     all  --  *      *       0.0.0.0/0            0.0.0.0/0           state RELATED,ESTABLISHED
    0     0 ACCEPT     tcp  --  *      *       0.0.0.0/0            0.0.0.0/0           state NEW tcp dpt:22
 2124 81930 REJECT     all  --  *      *       0.0.0.0/0            0.0.0.0/0           reject-with icmp-host-prohibited
Don't forget to save the new rule set, using the command described earlier.
The change needs to be made to the kernel of both Host A and Host B.
Stage 3: Using Draw with UDP multicast enabled in iptables
Now that we have added a rule to allow multicast UDP packets to reach processes, we repeat the same test with the new iptables configuration.
Diagnosing with McastSenderTest and McastReceiverTest
Host A:> java org.jgroups.tests.McastReceiverTest -bind_addr 192.168.0.100 -mcast_addr  224.10.10.10 -port 5555
Socket=0.0.0.0/0.0.0.0:5555, bind interface=/192.168.0.100
abc [sender=192.168.0.101:32770]
def [sender=192.168.0.101:32770]
Host B:> java org.jgroups.tests.McastSenderTest -bind_addr 192.168.0.101 -mcast_addr 224.10.10.10 -port 5555
Socket=0.0.0.0/0.0.0.0:32770, ttl=32, bind interface=/192.168.0.101
> abc
> def
From the console output from McastSenderTest and McastReceiverTest, we see the multicast messages are now appearing on the receiver console, as they should, displaying the text sent with each message. However, we still do not see the expected reply message on the console at the sender Host A. Again, no error emssages appear at either console.
We gain need to dig deeper with Wireshark to see what is going on.
Diagnosing with McastSenderTest and McastReceiverTest and Wireshark
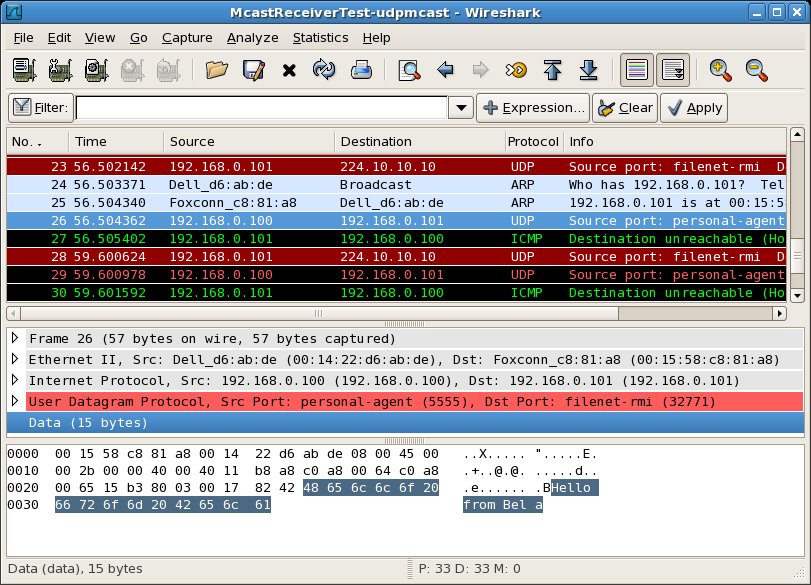
We shall again use Wireshark to capture packets on both the sender and receiver side. And as before, our attention will be directed to the blue highlighted packet in the packet list pane, and its details in the packet details pane. In order to follow the exchange of packets using the highlighting, i'll present a sequence of three packet capture views. But keep in mind they are all from the same session.
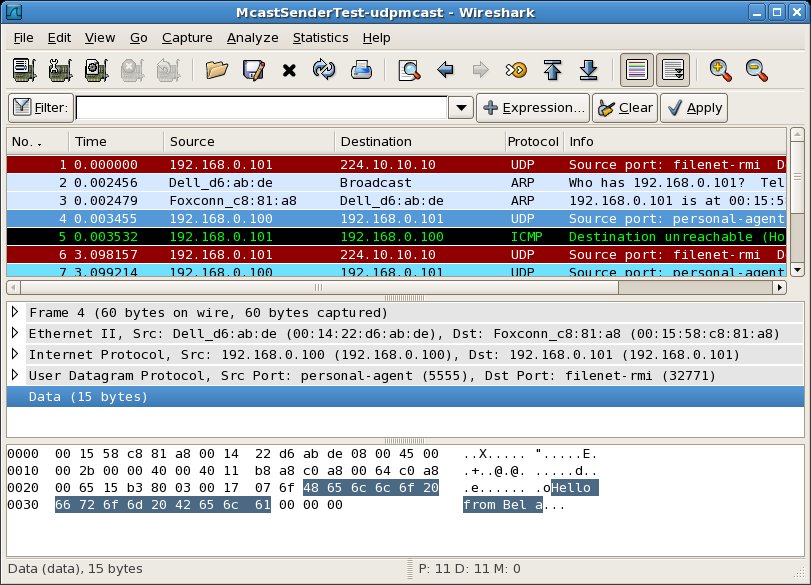
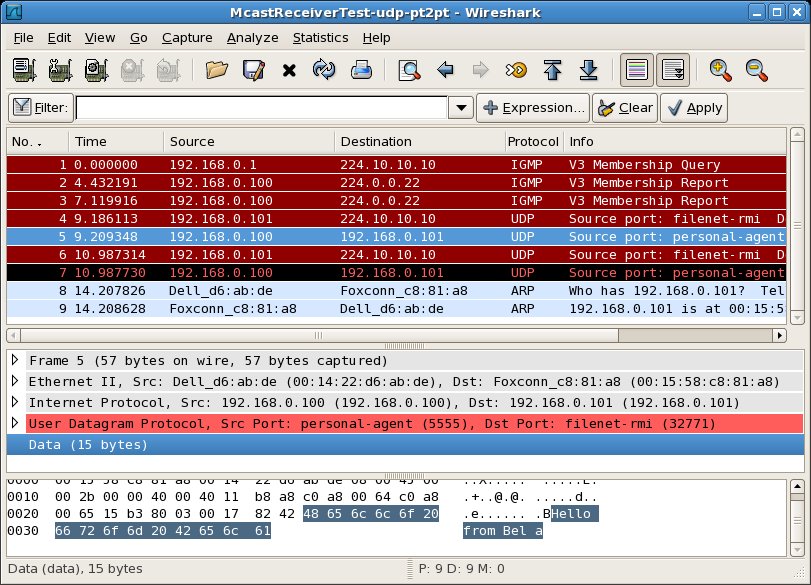
In the first pair of packet capture views (below), McastSenderTest sends a UDP multicast message from itself to the multicast address 224.10.10.10 (highlighted message 1). We also see that McastReceiverTest receives the packet (highlighted message 23):

In the second pair of packet capture views (below), McastReceiverTest sends a UDP point to point (reply) message from itself to the IP address 192.168.0.101 (highlighted message 26). This UDP message contains the reply text which we are expecting: "Hello from Bela". At the same time on Host B, we see that Host B receives the UDP point to point (reply) message from Host A to Host B (highlighted message 4)
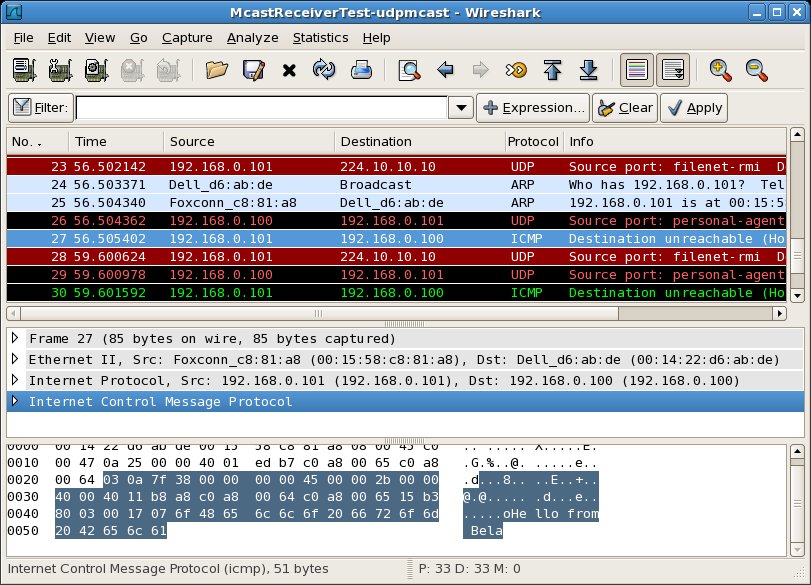
In the third pair of packet capture views (below), we see something new. In response to the UDP point to point (reply) message sent by Host A, Host B sends an ICMP message from itself to the IP address 192.168.0.100 (highlighted message 5). This message is an ICMP error message containing the text "Destination Host Unreachable (Host Administratively Prohibited) ". On Host A, we see that the ICMP message sent from Host B is received (highlighted message 27).
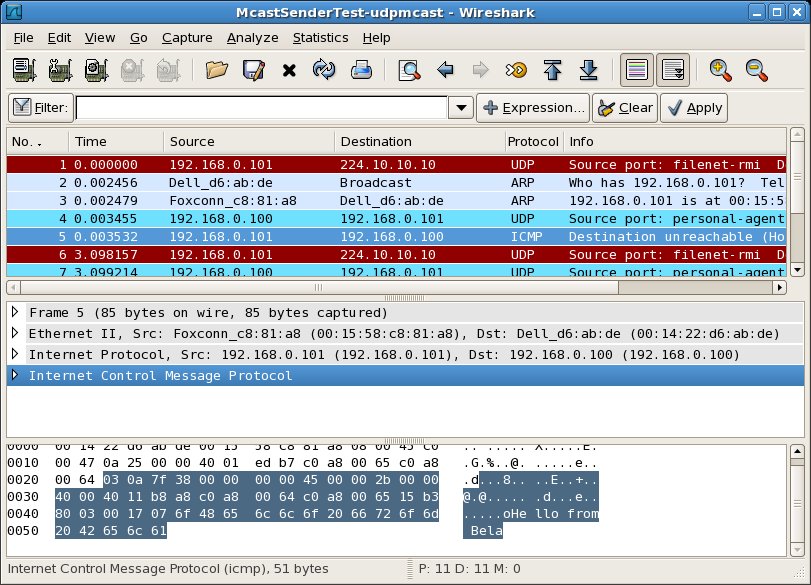
This ICMP message, with the error text "Destination Host Unreachable (Host Administratively Prohibited)" seems to indicate that the destination host (Host B) is unreachable. In this case, the host is unreachable probably because the firewall on Host B prevented the message from being delivered.
Re-examining the default iptables
If we check the current state of the iptables on Host B, although we added a rule to allow UDP multicast traffic through, there is still no rule which allows point to point UDP packets to pass through the firewall. And the fact that we received an ICMP message can be explained by looking at the last rule in the chain RH-Firewall-1-INPUT: the action of this rule (which will be triggered by a packet which does not manage any of the preceeding rules) is described as "reject-with-icmp-host-prohibited".
It appears that in order to allow the McastSenderTest to receive the UDP point to point replies which MCastReceiverTest sends to it, we must add another rule to our firewall, this time to allow UDP point to point messages through. In order to avoid creating a security risk, we shall restrict the destination of such packets to be our two host LAN. Here is the rule we can add:
Host A:# /sbin/iptables -I RH-Firewall-1-INPUT 9 -p udp -d 192.168.0.0/24 -j ACCEPT
This rule will allow all UDP packets destined for hosts on the network 192.168.0.0 through the firewall. We add the rule at position 9 in the RH-Firewall-1-INPUT chain. With the new rule added, our iptables now look like:
Host A:# /sbin/iptables -L -n -v
Chain INPUT (policy ACCEPT 0 packets, 0 bytes)
 pkts bytes target               prot opt in     out     source               destination
 333K  222M RH-Firewall-1-INPUT  all  --  *      *       0.0.0.0/0            0.0.0.0/0

Chain FORWARD (policy ACCEPT 0 packets, 0 bytes)
 pkts bytes target               prot opt in     out     source               destination
    0     0 RH-Firewall-1-INPUT  all  --  *      *       0.0.0.0/0            0.0.0.0/0

Chain OUTPUT (policy ACCEPT 305K packets, 29M bytes)
 pkts bytes target     prot opt in     out     source               destination

Chain RH-Firewall-1-INPUT (2 references)
 pkts bytes target     prot opt in     out     source               destination
 5998 1915K ACCEPT     all  --  lo     *       0.0.0.0/0            0.0.0.0/0
 1099  146K ACCEPT     icmp --  *      *       0.0.0.0/0            0.0.0.0/0           icmp type 255
    0     0 ACCEPT     esp  --  *      *       0.0.0.0/0            0.0.0.0/0
    0     0 ACCEPT     ah   --  *      *       0.0.0.0/0            0.0.0.0/0
    0     0 ACCEPT     udp  --  *      *       0.0.0.0/0            224.0.0.0/4
    0     0 ACCEPT     udp  --  *      *       0.0.0.0/0            224.0.0.251         udp dpt:5353
    0     0 ACCEPT     udp  --  *      *       0.0.0.0/0            0.0.0.0/0           udp dpt:631
    0     0 ACCEPT     tcp  --  *      *       0.0.0.0/0            0.0.0.0/0           tcp dpt:631
 324K  220M ACCEPT     all  --  *      *       0.0.0.0/0            0.0.0.0/0           state RELATED,ESTABLISHED
 1079  145K ACCEPT     udp  --  *      *       0.0.0.0/0            192.168.0.0/24
    0     0 ACCEPT     tcp  --  *      *       0.0.0.0/0            0.0.0.0/0           state NEW tcp dpt:22
 2124 81930 REJECT     all  --  *      *       0.0.0.0/0            0.0.0.0/0           reject-with icmp-host-prohibited
Stage 4: Using Draw with point to point UDP enabled in iptables
We now rerun the tests, with the iptables modified to allow UDP point to point packets through each firewall.
Diagnosing with McastSenderTest and McastReceiverTest
Host A:> java org.jgroups.tests.McastReceiverTest -bind_addr 192.168.0.100 -mcast_addr  224.10.10.10 -port 5555
Socket=0.0.0.0/0.0.0.0:5555, bind interface=/192.168.0.100
abc [sender=192.168.0.101:32770]
def [sender=192.168.0.101:32770]
Host B:> java org.jgroups.tests.McastSenderTest -bind_addr 192.168.0.101 -mcast_addr 224.10.10.10 -port 5555
Socket=0.0.0.0/0.0.0.0:32770, ttl=32, bind interface=/192.168.0.101
> abc
Host B:> << Received response from 192.168.0.100:5555: Hello from Bela
> def
Host B:> << Received response from 192.168.0.100:5555: Hello from Bela
Here, we now see the expected reply messages coming through.
Diagnosing with McastSenderTest and McastReceiverTest and Wireshark
Just confirm, we use wireshark to see packets now being transmitted between peers.
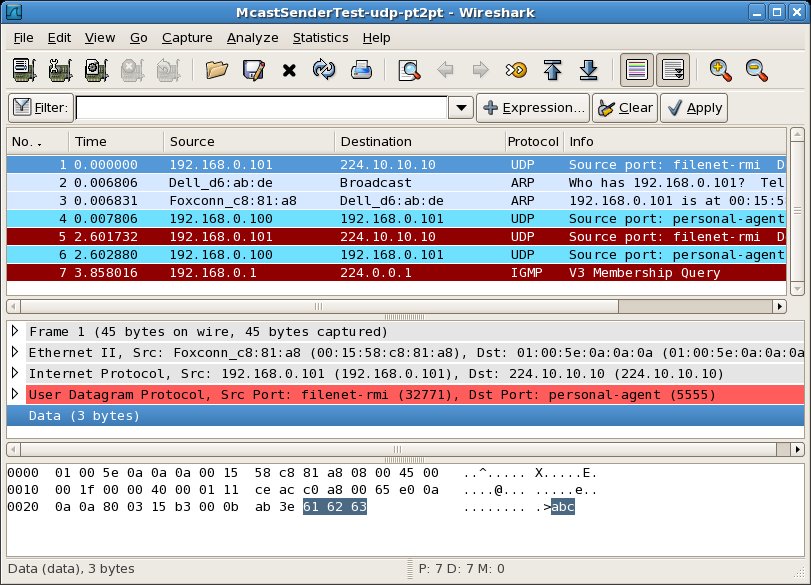
We know that McastSenderTest and McastReceiverTest now work. We should also confirm that Draw now works.
Retrying Draw between two hosts
If we now start up an instance of Draw on Host A and Host B, the two instances will now see each other, each displaying a group membership of 2, and drawing lines on one instance will appear on the other instance. This is the behaviour which we expect from the Draw application.
It has taken a number of changes to our network configuration to arrive at this stage, namely making sure that both UDP multicast messages and UDP point to point messages may be exchanged between the Draw processes on Host A and Host B.
A subtle error
However, a subtle error still lurks in our configuration, one which would not easily be detected unless we started examining closely the way in which these two instances of Draw each reacted to failures of the other.
The following screenshot shows packets captured at Host B after the startup of the Draw application:
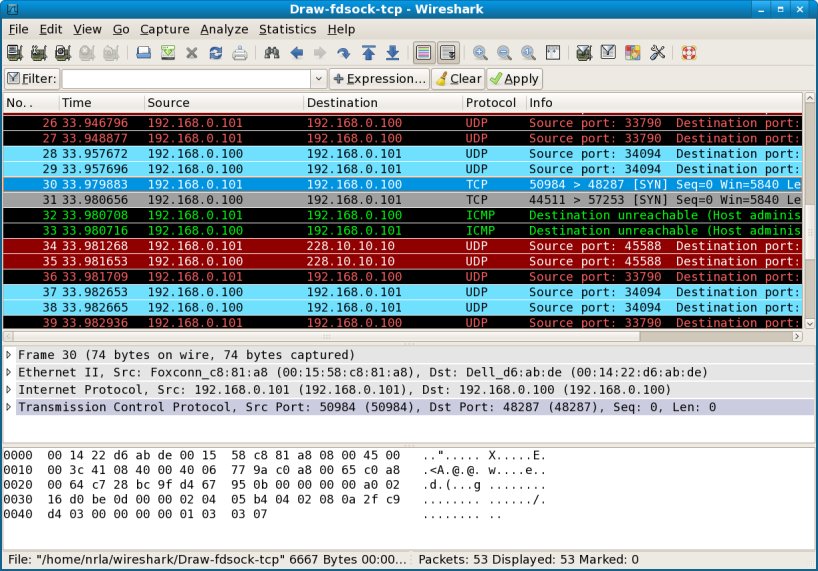
This capture session involves a lot of packets, but it doesn't take long before we see packets which should not be present: ICMP Destination Unreachable. We know by now that this probably indicates that one group member is trying to send packets to the other group member, but those packets are not being correctly delivered, due to the packets being REJECTed by the host's firewall rules.
In fact, there are two ICMP Destination Unreachable packets (packet 32 and 33 in the display list pane) - one sent from Host A to Host B, and one sent from Host B to Host A. If we look immediately above the ICMP Destination Unreachable packets, we see two TCP packets (packet 30 and 31) and again, one from Host A to Host B and one from Host B to Host A. Looking at the Info for the packets, we can see that the SYN flag is set. When one process establishes a TCP connection with another, a 3-way handshake of SYN, SYN-ACK, and ACK packets are exchanged between the processes in order to exchange initial sequence numbers and other control information. It appears that each group member was trying to initiate a TCP connection with the other, and the attempts failed because the TCP SYN packets were being rejected by the firewall on each host.
This is in fact the case. The udp.xml stack in JGroups by default includes the protocol FD_SOCK, a failure detection protocol which makes use of TCP connections to quickly detect failures of group members. What we are seeing is FD_SOCK trying to establish TCP connections and failing. As mentioned earlier, this failure for fD_SOCK to correctly initialise itself may only become apparent when group members crash and their failures are not detected in a timely manner.
The lesson here is that JGroups can sometimes mix UDP and TCP point to point communication, depending on the stack configuration, and we generally need to adjust firewall rules to allow for TCP connections to be set up.
Stage 5: Using Draw with point to point UDP and TCP enabled in iptables
Therefore, we need to add one final rule to our set of firewall rules, in oder to allow processes on our LAN to correctly establish point to point TCP connections:
Host A:# /sbin/iptables -I RH-Firewall-1-INPUT 11 -p tcp -d 192.168.0.0/24 -j ACCEPT
This rule is very similar to that of the UDP point to point rule. Simply note that it needs to be correcly positioned in the list of rules (we place it at position 11, immediately after our UDP rule).
The new set of firewall rules now looks like this:
Host A:# /sbin/iptables -L -n -v
Chain INPUT (policy ACCEPT 0 packets, 0 bytes)
 pkts bytes target               prot opt in     out     source               destination
 333K  222M RH-Firewall-1-INPUT  all  --  *      *       0.0.0.0/0            0.0.0.0/0

Chain FORWARD (policy ACCEPT 0 packets, 0 bytes)
 pkts bytes target               prot opt in     out     source               destination
    0     0 RH-Firewall-1-INPUT  all  --  *      *       0.0.0.0/0            0.0.0.0/0

Chain OUTPUT (policy ACCEPT 305K packets, 29M bytes)
 pkts bytes target     prot opt in     out     source               destination

Chain RH-Firewall-1-INPUT (2 references)
 pkts bytes target     prot opt in     out     source               destination
 5998 1915K ACCEPT     all  --  lo     *       0.0.0.0/0            0.0.0.0/0
 1099  146K ACCEPT     icmp --  *      *       0.0.0.0/0            0.0.0.0/0           icmp type 255
    0     0 ACCEPT     esp  --  *      *       0.0.0.0/0            0.0.0.0/0
    0     0 ACCEPT     ah   --  *      *       0.0.0.0/0            0.0.0.0/0
    0     0 ACCEPT     udp  --  *      *       0.0.0.0/0            224.0.0.0/4
    0     0 ACCEPT     udp  --  *      *       0.0.0.0/0            224.0.0.251         udp dpt:5353
    0     0 ACCEPT     udp  --  *      *       0.0.0.0/0            0.0.0.0/0           udp dpt:631
    0     0 ACCEPT     tcp  --  *      *       0.0.0.0/0            0.0.0.0/0           tcp dpt:631
 324K  220M ACCEPT     all  --  *      *       0.0.0.0/0            0.0.0.0/0           state RELATED,ESTABLISHED
 1079  145K ACCEPT     udp  --  *      *       0.0.0.0/0            192.168.0.0/24
    0     0 ACCEPT     tcp  --  *      *       0.0.0.0/0            192.168.0.0/24
    0     0 ACCEPT     tcp  --  *      *       0.0.0.0/0            0.0.0.0/0           state NEW tcp dpt:22
 2124 81930 REJECT     all  --  *      *       0.0.0.0/0            0.0.0.0/0           reject-with icmp-host-prohibited
After applying this rule and saving the new firewall rules on both hosts, the Draw application is now able to exchange all of the control messages it needs to between the two hosts on our small network configuration.
Conclusions
We saw that for this small network, we had to adjust the default configuration by:
enabling multicast in the router/switch used to connect the two hosts
defining a rule in the firewall of each host to allow UDP multicast packets to reach their intended destinations
defining rules in the firewall of each host to allow point to point UDP and TCP packets to reach their intended destinations
However, every network is different, and it may be that other steps may need to be taken to allow JGroups peers to communicate correctly. Wireshark can be very helpful in debugging any such network configuration problems.


Comments